Configuring EST
To perform client certificate enrollments using EST protocol, the admin or a privileged user needs to first set up the EST server agent using the AppViewX portal. Upon successful set up of the EST server Agent through the portal, a URL will be generated. Clients can then use this URL to send enrollment requests to AppViewX via EST protocol.
The detailed steps for setting up the EST server agent are listed below:
- Log in to AppViewX application with admin or privileged user credentials.
- Click the menu button located in the upper left corner of the screen.
The left navigation pane appears.
- Navigate to CERT+ > ADMINISTRATION > Auto Enrollment > EST.
- Select Add or Configure Now.
-
Configure the Agent Details details as follows:

Field Name Field Type Mandatory Description Validation Name Text Yes Unique name to identify the Agent setting. No special characters other than ‘.’, ‘-’,’_’ are allowed. Name should not start with special characters. Host Text Yes IP address of the AppViewX node.
Invalid IP address(example: xxx.xxx.xxx.xxx) Port Text Yes HTTP gateway port of the AppViewX node. Port will accept only numerical values between 0 to 65535. -
Configure the Client Authentication details as follows:
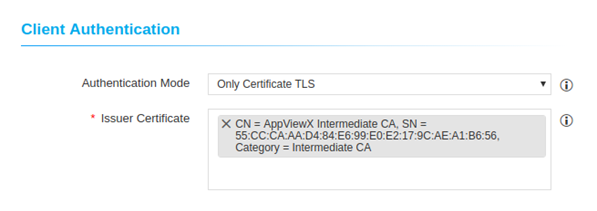
Only Client Certificate Authentication Mode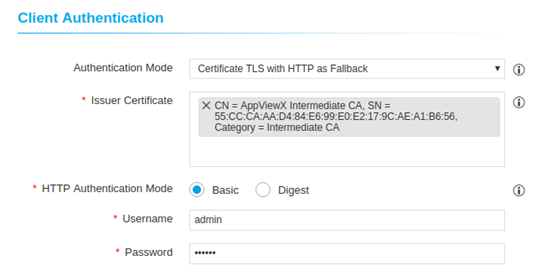 Client Certificate Authentication with HTTP Fallback Mode
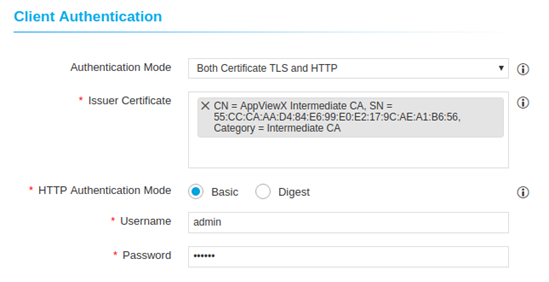
Both Client certificate and HTTP Authentication Mode
Field Name Field Type Mandatory Description Validation Authentication Mode Dropdown Yes Select any one authentication method to be carried out during communication with clients. NA Issuer Certificate
Dropdown Yes Select one or more issuer certificates which needs to be checked for the client certificate authentication.
NA HTTP Authentication Mode Radio button Yes Select the type of HTTP auth mode either Basic/Digest. NA Username Text Yes Username for HTTP authentication. NA Password Text Yes Password for HTTP authentication. NA -
Configure the CA Accounts details as follows:

Field Name Field Type Mandatory Description Validation Certificate Group Dropdown
Yes
Select a specific group under which certificate needs to be enrolled.
NA
Certificate Type Radio button
Yes
Select a specific certificate type (Server / Client) to be enrolled.
NA
Select CA Dropdown Yes
Select a specific CA from which the certificate needs to be enrolled.
Note:-
If the selected CA is Microsoft Enterprise, a separate section displaying Vendor Specific Details is displayed after the CA Accounts section.
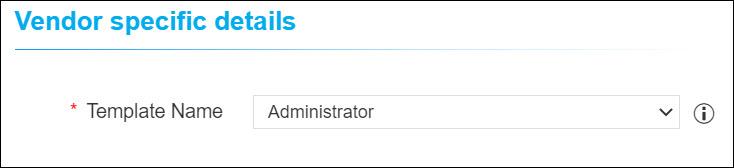
Under the Vendor Specific Details section: Select the required Template Name. -
If the selected CA is Ejbca, a separate section displaying Vendor Specific Details is displayed after the CA Accounts section.
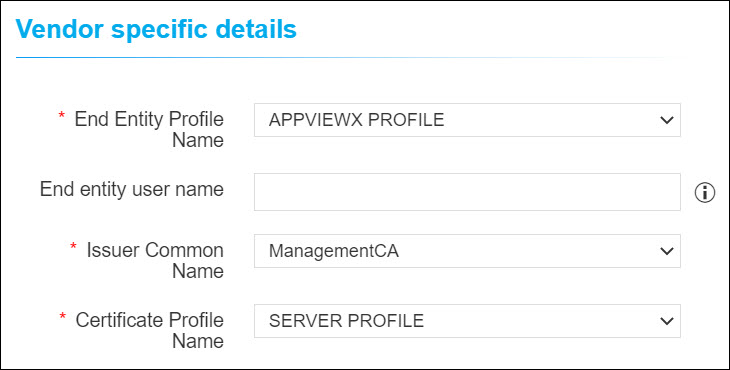
Under the Vendor Specific Details section: Select the required details.
NA
CA Account Dropdown
Yes
Select a specific CA Account from the selected CA which is to be used for certificate creation operations.
NA
CA Certificate Dropdown
Yes
Type 3 or more letters of the certificate keywords after which a list of server certificates issued from the above selected CA account will be displayed, one certificate can be selected for further communications with EST client machine.
NA
CA Connector Name Text
Yes
Name of the CA connector after certificate is being enrolled.
NA
Certificate Validity Text
Yes
Validity of the certificate to be enrolled.
Certificate validity accepts only numerical values.
-
-
Configure the Advanced Settings details as follows:
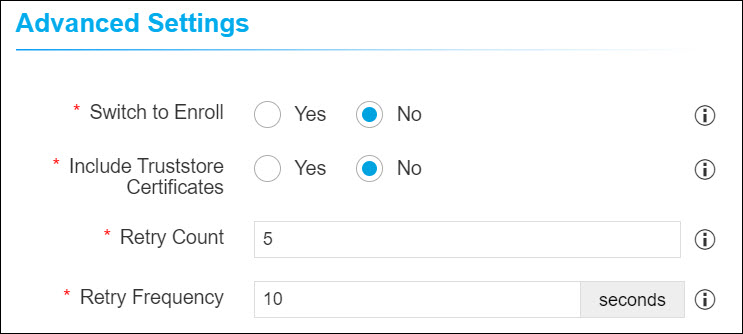
Field Name Field Type Mandatory Description Validation Switch to Enroll Radio button Yes By default, this option is selected as No. If you select Yes, the re-enrollment requests are converted to enrollment requests. Include Truststore Certificates Radio button Yes Select whether issuer certificate needs to be sent to client machines after enrolment. NA Retry Count Text Yes Specify a retry count upto which the agent will retry for the certificate to be fetched.
NA Retry Frequency Text Yes Specify a retry frequency upto which the agent will wait for each retry count. NA - Click Save.