Running F5 BIG-IP Golden Config Compliance
To run this workflow,
-
Go to
 Menu > Request > View/Run.
The Workflow Catalog page appears.
Menu > Request > View/Run.
The Workflow Catalog page appears. - In the Workflow Catalog page, hover over the F5 BIG-IP Golden Config
Compliance workflow.
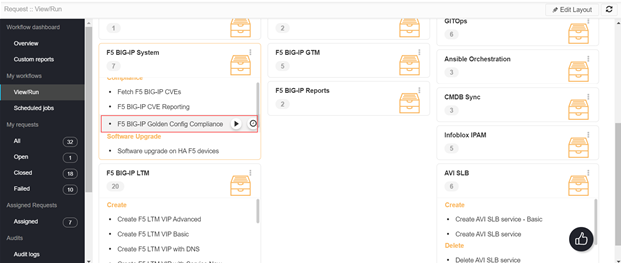
The Run and Schedule buttons are shown. - Click the Run
 button.
The Form Input page opens:
button.
The Form Input page opens: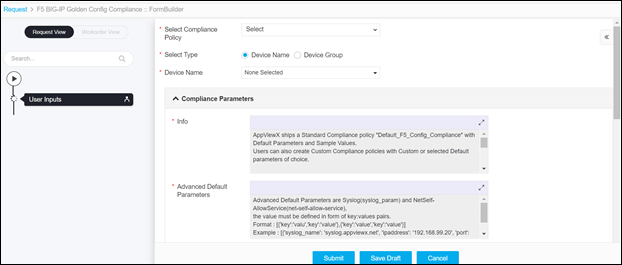
-
Select the Select Compliance Policy from the drop-down option.
The Compliance Policy options are:
-
Create New Compliance – Select this option if you want to create a custom
compliance policy file. When you select this option, the Compliance Policy Name field
is shown in the form input to enter the name of the compliance policy file name.

- Default_F5_Configuration_Compliance - Select this option to use the Standard Compliance policy file, which was shipped by AppViewX.
- <Custom Compliance Policy File Name> - Other custom compliance policy files If any custom compliance policy file was created already.
-
Create New Compliance – Select this option if you want to create a custom
compliance policy file. When you select this option, the Compliance Policy Name field
is shown in the form input to enter the name of the compliance policy file name.
-
Select the Select Type options are:

-
Device Name - When you select Device Name option, you get the option to
select devices in the Device Name field for which the compliance policy
validation is triggered.Note: Only the devices that are in managed and active status are displayed for the selection.

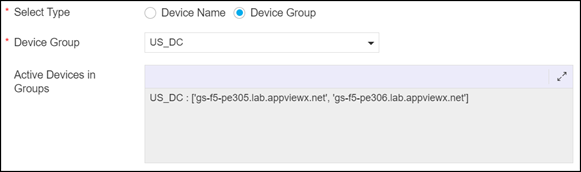
- Device Group - When you select the Device Group option, you get the option to
select the device group in the Device Group field for which the compliance policy
validation is triggered.Note: Only the devices that are in managed and active status within the group are displayed.
-
Device Name - When you select Device Name option, you get the option to
select devices in the Device Name field for which the compliance policy
validation is triggered.
-
After the Device Name selection or Device Group selection, the Compliance
Parameter Table is updated with the parameters based on the selected compliance
policy.
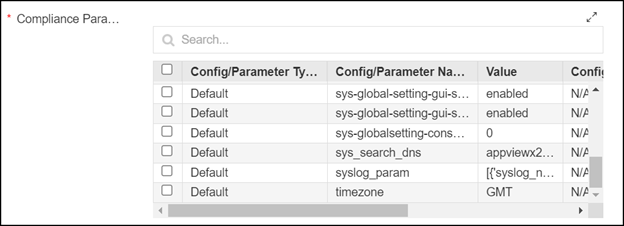
- When the Create New Compliance or Default_F5_Configuration_Compliance
option is selected in the Select Compliance Policy field, the Compliance
Parameter Table displays the Default parameters.
- The Default Parameters Value in the Compliance Parameter table must be
modified accordingly. To modify,
- Select a Param:

- Modify Value for a Param:
- Update the Value. To update the modified value into the table, click the
edit
 button.
- Select a Param:
- New Custom Parameters can also be added. The custom parameter can be added by
providing the details for it as follows:
- If the Default compliance policy is selected and the values are modified, save
this as a new compliance policy by clicking the Save as option as
Yes.

- If you select the Save as option as No, the modified values or added any custom parameter will not be saved as a new compliance policy.
- On selecting a specific compliance policy in the beginning of this form, the Compliance Parameter Table displays default and custom parameters as customized.
- If any values are modified or any new custom parameter is added to the table,
then you can save them in the compliance policy by selecting the option Update
Policy – Yes.

- The Default Parameters Value in the Compliance Parameter table must be
modified accordingly. To modify,
Note:- You can only update the values for the default parameters and should not modify the Config/Parameter Name field for Default parameters. Modifying the Config/Parameter Name field might lead to incorrect validation.
- Any new Config/Param added as type Default will also be considered as Custom parameter.
- When the Create New Compliance or Default_F5_Configuration_Compliance
option is selected in the Select Compliance Policy field, the Compliance
Parameter Table displays the Default parameters.
-
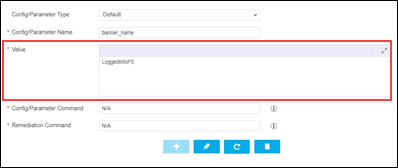
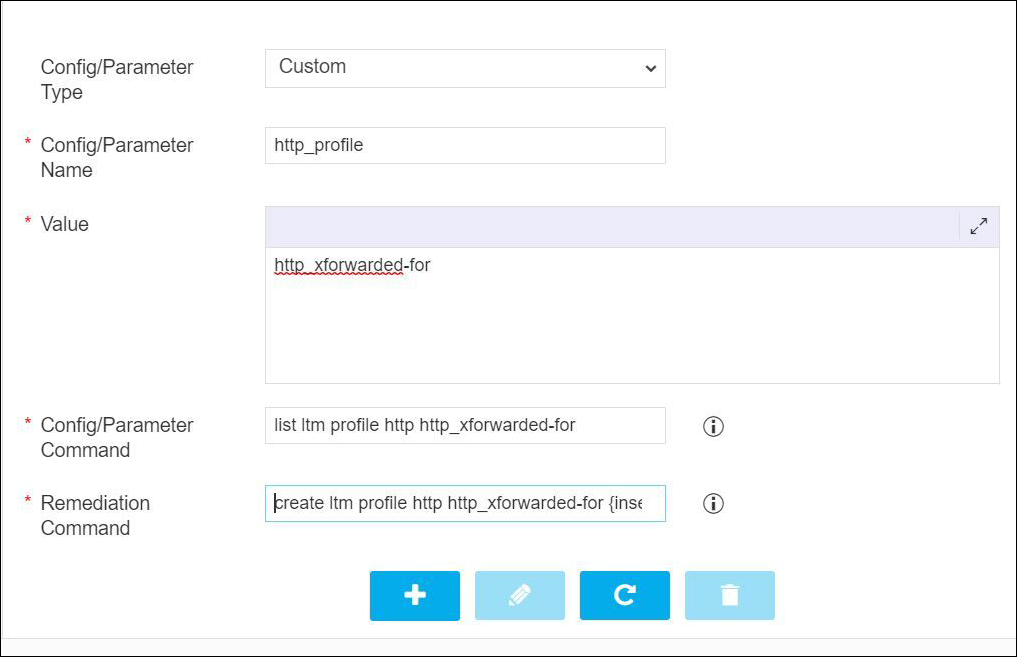
In the Compliance Parameter Table, select or enter the following details:
Field Description Config/Parameter Type You can select Custom or Default Config/Parameter type. For Custom Compliance policy, the Config/Parameter type is considered as Custom by default even if it is selected as Default. Config/Parameter Name Enter the config/parameter name. Value Enter the expected value in the device for the parameter. Config/Parameter Command Enter the command to validate the parameter (Applicable only for Custom Parameter). For the Default parameter, the command is defined by AppViewX. Remediation Command Enter the command to remediate the parameter (Applicable only for the Custom parameter). For the Default parameter, the command is defined by AppViewX. -
To add a new parameter to the Compliance Parameter Table, click Add (
 ) button After adding the parameter,
you can manage (update/delete) it.
) button After adding the parameter,
you can manage (update/delete) it.
-
Click the Submit button.
The Confirmation popup opens.Note:
- If you want to save this form to edit it later, click the Save Draft button, and then click Ok in the Confirmation popup window. The form will be saved as Open request under Request > All.
- If you want to cancel this form, click the Cancel button.
- Click Ok to submit the form.
- The Compliance Check runs automatically and generates Compliance Grid Report.
-
From the Compliance Grid Report, you get to know if the device parameters are Compliant
or Non-Compliant.
You can download the Compliance Grid Report in the
.csvor.xlsxformat by clicking the Download ( ) button.
The summary of the Compliance Grid Report are:- The first column displays the device name.
- The other columns display Config/Parameter names.
- The report has two body rows. They represent the following:
- First Row - the status of the Parameter in the device.
- Second Row - the actual value of the parameter in the device.
-
Click the Submit button, and then click Ok in the confirmation
pop-up.
The Compliance Diff check runs.
- The Compliance Diff check displays the details of non-compliant parameters for each device.
-
The details are:
- Parameter name and the value in the selected policy – shown in the left side of the diff Palate-Golden Config.
- Parameter name and the value in the selected device - shown in the right side of the diff Palate-actual config.
Note: To view the compliance difference for the other devices, select a device from the field value drop-down list in the left and/or right side of the diff Palate.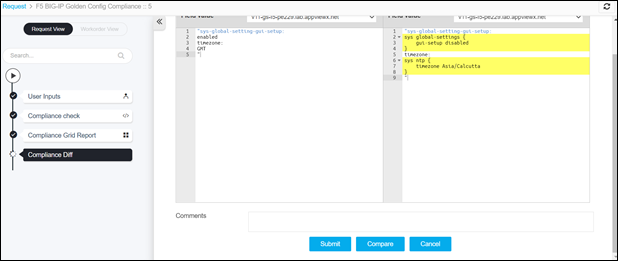
- Click the Submit button, and then click Ok in the confirmation pop-up.
-
The Compliance Policy Create/Update runs automatically:
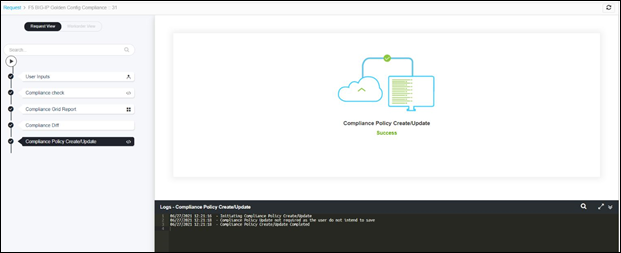
Note: At this phase, the policy is created/updated if you have selected the option Create New Compliance, SaveAs – Yes, Update Policy -Yes in the form input. -
Remediation Review: The Page displays a list of the Non-Compliant Parameters. By
default, two options are displayed: No, Yes.
- No – By default this option is selected. When this option is selected and you Submit, the remediation will not be applied to the non-compliant parameters, the workflow ends.
-
Yes – When you select Yes, the remediation table is displayed for the
non-compliant parameters.
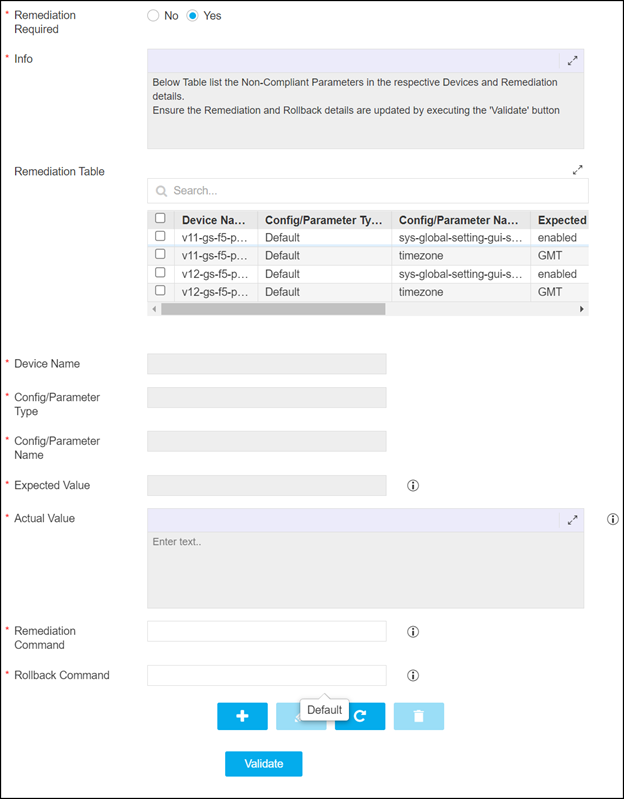
Note:- In case any custom parameter is part of this remediation table, then update the rollback command in the Rollback Command field.
- For default parameters, the remediation or rollback command is not required to be provided.
- If the rollback command is not updated for the custom parameter, you do not get the rollback option in case to revert the device parameter to the older state.
- Once the remediation command and rollback command are updated to the device, click the Update button.
- Validate the remediation and rollback details by clicking the Validate button
until the message Validation is Successful is seen.

-
Click the Submit button, and then click Ok in the confirmation
pop-up.
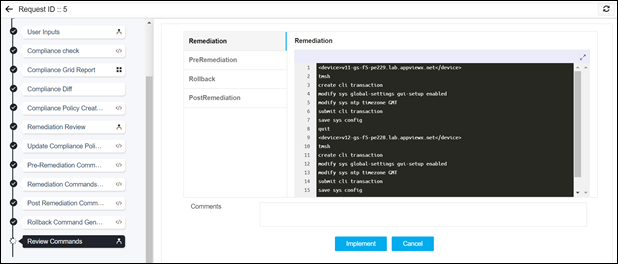
The update of remediation and rollback commands run automatically and generates Review Commands to review and implement the changes.
-
If required, review the commands that are about to be executed in the F5 load balances
in the following tabs:
- Remediation
- PreRemediation – List the values of the parameter, prior Remediation.
- Rollback – Revert the parameter’s value to the previous state of Remediation.
-
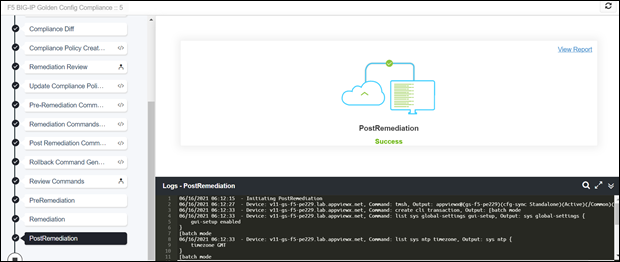
PostRemediation - List the values of the parameter, post Remediation.

-
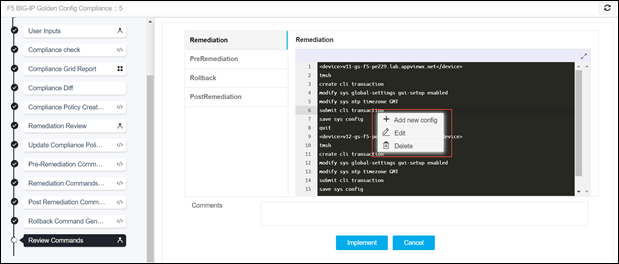
You can edit the commands at this stage, by clicking the right-mouse button in the
desired tab.
-
Once reviewed the commands, click the Implement button, and then click Ok in the
confirmation pop-up.
The implementation process completes:
-
In case the request has to be reverted, perform the following steps
- Go to the Menu > Request > All.
- Right-click the row on your desired Request ID.
- Select the Rollback option.

- Select Yes on the Rollback confirmation dialog.
- A new request is triggered for performing rollback.
-
Mapping for the Default Parameter Name to Actual Parameter in Device:
Default Parameter Name Actual Parameter banner_name: 
banner_state 
cm-device-group-auto-sync Compliant or Non-Compliant is decided based on the below logic:
In each of the cm device-group config, first it is checked whether “type sync-failover” is there. If it exists, then “auto-sync” value in the device is cross checked with the value defined in the Policy, if all match compliant, else non-compliant. Remediation happens only for Non-Complaints.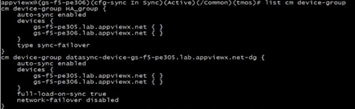
dns_ip_address 
gateway_ip 
httpd-allow 
httpd-auth-pam-idle-timeout 
httpd-redirect-http-to-https 
httpd-ssl-protocol
net-self-allow-service The Parameter is compliant or Non-Compliant is decided based on the key “allow-service”. In each net self config, it is checked if the value of allow-service in the device matches with the one defined in AppViewX. If all config matches, it is Compliant, else it is Non-Compliant. Remediation happens only for the config that are Non-Compliant. Only Default Values are supported (none, default, all) and no custom values are supported. Example for custom value is tcp:8844.

ntp_ip_address 
ssh_inactivity_timeout 
sys-global-setting-gui-security-banner 
sys-global-setting-gui-setup 
sys-globalsetting-console-inactivity-timeout 
sys_search_dns 
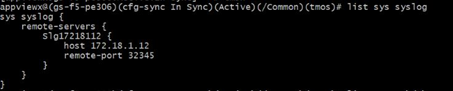
syslog_param
syslog_param Compliant or Non-Compliant is based on the points below:
- If the IP and Port defined in Golden config match with the device, then compliant. Then, no action is required.
- If Syslog Name, IP, or port defined in Golden config does not match, then it is non-compliant. Then, update the IP or port.
- · If the Syslog Name and IP or port defined in the golden config do not match, then create a new Syslog config.
timezone 