Installing a Validator:
Validator analyzes an Agent and validates all the prerequisites before installing an agent. It is also used to troubleshoot any issue that occurs in the managed machines that run on a network. Before installing AppViewX gateway and the certificates, make sure you have downloaded the validator to either the Downloads folder or to the Desktop in your local environment.
- Click the AppViewX.CertPlus.Validator.exe file to open the application for validation.
- In the AppViewX CertPlus Validator screen that opens enter all the mandatory fields in the Basic Information section to proceed.
- Select the Agent, Certificate Authority, IIS, and Non-IIS checkbox depending on what you want to validate and manage in the target machine.
- Based on the checkboxes you selected, the fields that are mandatory will be highlighted in Red color.
- The CA Name is required only if the Certificate Authority check box is selected.
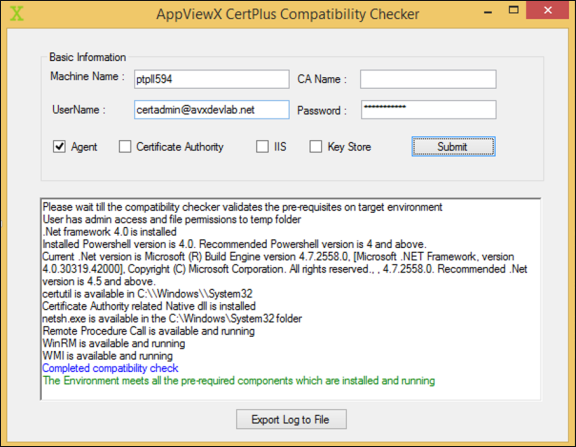
Click Submit and the results are displayed as shown in the following image:
- AppViewX CertPlus Compatibility Checker is used for troubleshooting or validating the prerequisites as part of Windows Agent Installation. It comprises the following fields:
| Name | Description | Condition |
|---|---|---|
| Machine Name | The name of the target machine must be validated. It is a hostname. | Mandatory field |
| CA Name | The name of the CA in the CA config. | Mandatory only when a CA is selected |
| User Name | User Name to be used for validating the target machine. It is in the format "username@domainname". | Mandatory field |
| Password | The password corresponding to the provided user name. | Mandatory field |
Options
- User can select single or multiple options based on the installation/ troubleshooting criteria:
- Agent: Select this option if we need to install an agent in the target machine which is configured in the "Machine Name". It will validate the prerequisites which are required for Agent Installation
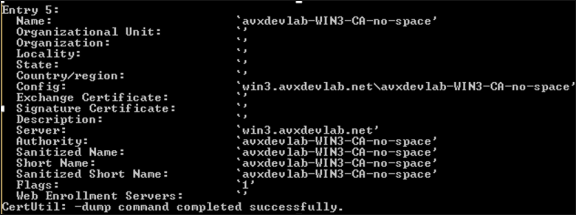
- Certificate Authority: Select this option if we need to
validate the Certificate Authority related functionality. The CA
Name is mandatory only in this case. Use the certutil -dump command
to get the CA Name. In the output of certutil command use-value in
the "Server" as the Machine Name and use "Name" as the CA Name.
- Based on the example below the machine Name is win3.avxdevlab.net and CA Name is avxdevlab-WIN3-CA-no-space.
- IIS: Select this option if we need to validate the IIS sites related functionality.
Validations
| Validate | Agent | CA | IIS | Keystore |
|---|---|---|---|---|
| User | Yes | Yes | Yes | Yes |
| .Net framework | Yes | Yes | Yes | Yes |
| Powershell | Yes | Yes | Yes | Yes |
| CertUtil | Yes | Yes | No | No |
| Certadm.dll | Yes | Yes | No | No |
| netsh | Yes | No | No | No |
| RPC | Yes | Yes | Yes | Yes |
| WinRM | Yes | Yes | Yes | Yes |
| WMI | Yes | Yes | Yes | Yes |
| IIS | No | No | Yes | No |
- KeyStore: Select this option if you need to add to validate only the Microsoft Certificate Store related functionality
- User Access: It will validate by connecting to the target machine with the specified username and password and check if it has admin access.
- .Net Framework: It will check if .Net framework 4.5+ is installed and will display the current .Net framework version.
- Powershell version: It will check if Powershell is installed and will display the current Powershell version
- CertUtil: It will check if certutil component is available. This is used to get the CA name and the corresponding templates.
- CertAdm.dll: This is the native component used to access the CA and will check if this component is available in the C:WindowsSystem32 folder. Sometimes, while trying to access this component during the verification it will return an error and hence, a manual check must be performed.
- netsh.exe: This is used to bind the certificate to the installed agent port (8999).
- RPC service: The remote procedure call service must be running to perform all the remote operations and it will validate if the service is installed and running on the target machine.
- WinRM service: Windows Remote Management service is required for the Powershell execution and it will validate if the service is installed and running on the target machine.
- WMI service: Windows Management Instrumentation service is required for WMI and Powershell execution and it will validate if the service is installed and running on the target machine.
- IIS: It will check if the IIS server is installed and identify the current IIS version.
Color Codes during the Execution
- Black: Success information and output
- Red: An error or warning, must take corrective action based on the prerequisite document in case of any issues
- Blue: Completion of the validation process
- Green: Complete process is successful
Export Log to File: This is used for exporting the validation summary into a log file.
Steps to test gateway installation:
To test the installation, go to the following URL:
https://localhost:8999/appviewx/
https://<IP/Hostname>:<Port>/appviewx/rest/help ( Needs the
certificate to be on the store/ browser)
For example, https://xx.xx.xx.xx:8999/appviewx/rest/help
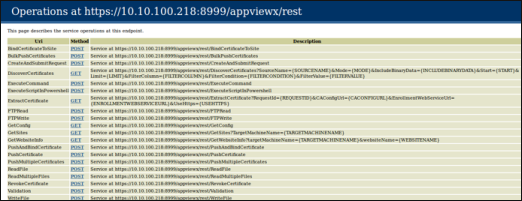
- The above page confirms the accessibility and installation of the service.
- In case, a different client authentication certificate is being used, ensure that the CRL mentioned in the certificate is reachable from the AppViewX Windows gateway hosting server.
- Go to AppViewX>> Settings>> Certificate to register the gateway with AppViewX.
- Register the gateway with the URL format as follows:
https://<IP/Hostname>:<Port>/appviewx
For example, https://xx.xx.xx.xx:8999/appviewx
Modify Agent services with the service Account The Windows gateway agent can be installed using a service account or an admin account.
- If the customer has a policy that states that the service
account cannot be part of the administrator group or that the
service account is only a part of the user group, then:
- The gateway agent service is installed using an admin account.
- The installed agent service is updated with the service account details in services.msc. Add the account in the properties of the AppViewXCert Plus service.
- Services.msc -> AppViewXCert Plus -> Right click ( Properties) -> LogOn .> Update the user account in the format of username@domainname.
- Refer to the following image.

- In this case, the following command has to be executed from the PowerShell:
Netsh http add urlacl url=https://+:8999/appviewx/user=appviewx.localmscatest01
- In the above command, the value for user = <domainserviceaccount> and the URL must be changed respectively.
- Once this is done, stop and start the AppViewXCertPlus Service in services.msc.