| *Server Name |
Name of the RADIUS server. |
| *Host |
The IP address of the RADIUS server. |
| *Shared secret |
A unique key for authentication between the AppViewX
server and the RADIUS server. |
| *Authentication port |
Port number that AppViewX will use for authentication.
Note: The default authentication
port number is 1812. Please check with your sysadmin
if your organization uses a different port
number.
|
| *Acceptance port |
Port number that AppViewX will use to accept a response
from the RADIUS server.
Note: The default acceptance port
number is 1813. Please check with your sysadmin if
your organization uses a different port
number.
|
| *Authentication mode |
Select one of the following authentication modes:
- PAP/ASCII
- CHAP
- MS-CHAPv2
- EAP-MD5
Note: Ensure that the selected
authentication mode is also confirmed in the RADIUS
server settings.
|
| Authorization via |
Select from one of the following authorization modes: Note: This field is enabled
only whrn the the Authorization toggle is turned
on. |
| *Vendor ID |
Enter the vendor ID.
Note: This field is enabled only
whrn the the Authorization toggle is turned on and
authorization is done via the RADIUS server.
Note: AppViewX does not have a
unique vendor ID. We use a free vendor ID:
500. Ensure that this is configured as part
of the RADIUS server settings.
|
| *Vendor type |
Enter the vendor type.
Note: This field is enabled only
whrn the the Authorization toggle is turned on and
authorization is done via the RADIUS server.
Note: AppViewX does not have a
unique vendor type. We use a free vendor ID:
200. Ensure that this is configured as part
of the RADIUS server settings.
|
| *LDAP |
From the dropdown menu, select the LDAP server to be used
for the authorization.
Note: This field is enabled only
whrn the the Authorization toggle is turned on and
authorization is done via the LDAP server.
|
| All * marked fields are
mandatory. |
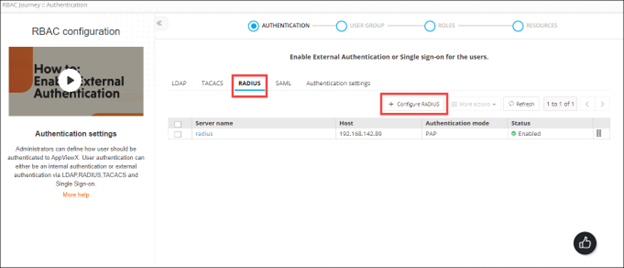 The Configure RADIUS action is displayed.
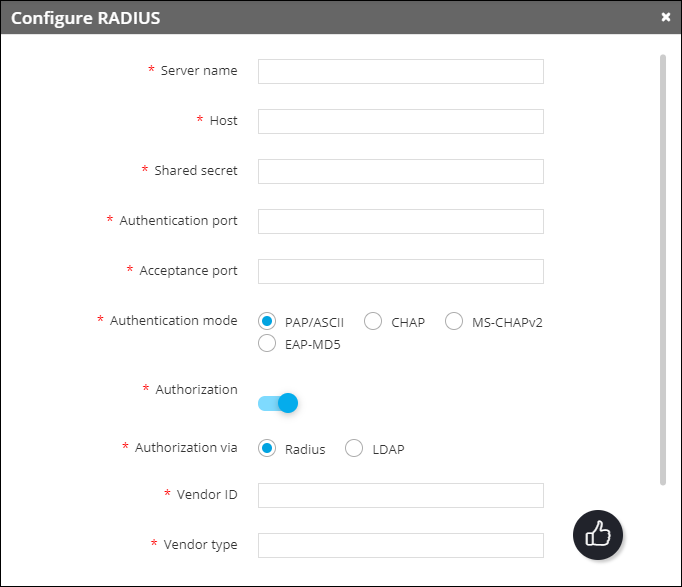
 Note: In the case of multiple RADIUS servers, to define/update the order in which the servers will be authenticated, drag and drop the entries in this table.