Configuring Sectigo CA
To configure the Sectigo CA,
- Log in to AppViewX application with valid credentials.
-
Click the menu button located in the upper left corner of the screen.
The left navigation pane is displayed.
-
Click CERT+ >
ADMINISTRATION >
Certificate Authority.
 The Certificate Authority home page is displayed.
 -
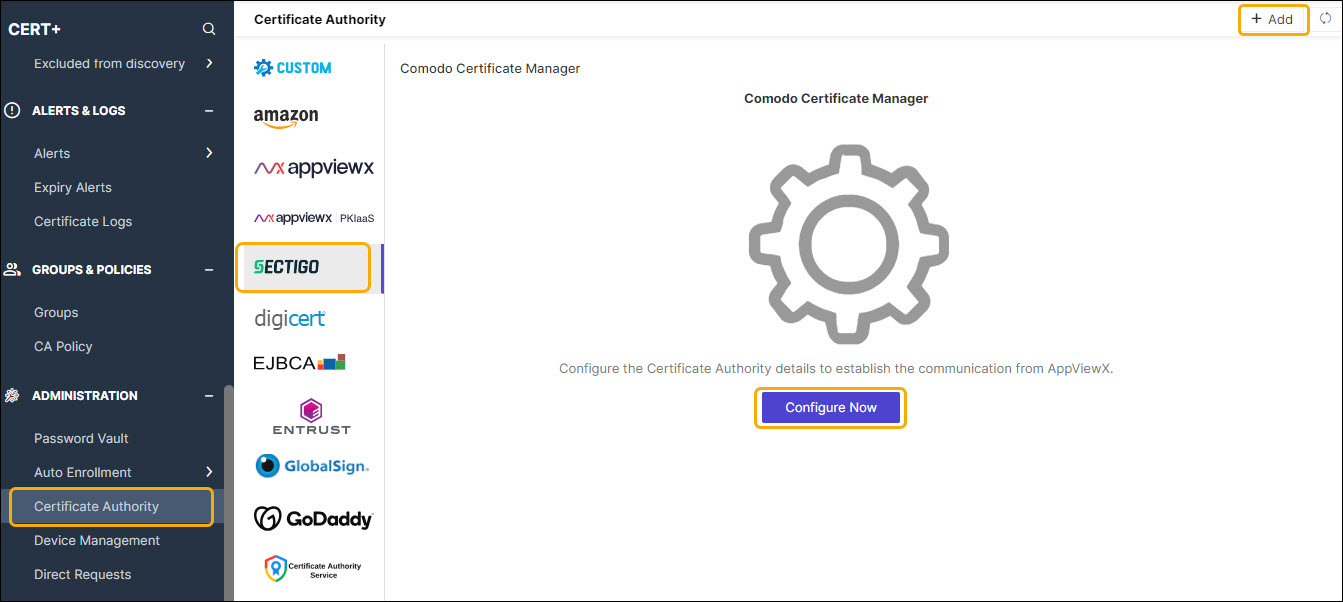
Click Sectigo from the left pane of the page.
The Sectigo CA home page is displayed.
- (Optional if creating for the first time) Select the Comodo Certificate Manager tab.
-
Click +Add. or Configure Now
The Sectigo CA details page is displayed.
-
Update the following details in the General Information section as
described in the table:
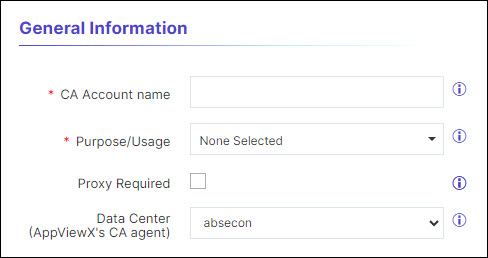
Table 1. General Information - Field Description Table Name Description *CA Account name A unique name to identify the CA setting. Note: No special characters other than ‘.’, ‘-’,’_’ are allowed. Names should not start with special characters.
*Purpose/Usage Certificate Type for which CLM actions will be enabled. Example: Server and Client.
Proxy Required Enable this field if the CA communication needs to happen via Proxy. The proxy details configured in general settings will be used for communication. Data Center (AppViewX's CA agent) Select the data center through which the CA communication needs to happen. Note: The asterisk (*) symbol indicates a mandatory field. -
Update the following details in the CA Configuration section as
described in the table. These fields are necessary for invoking the Sectigo CA
APIs for Certificate Management.
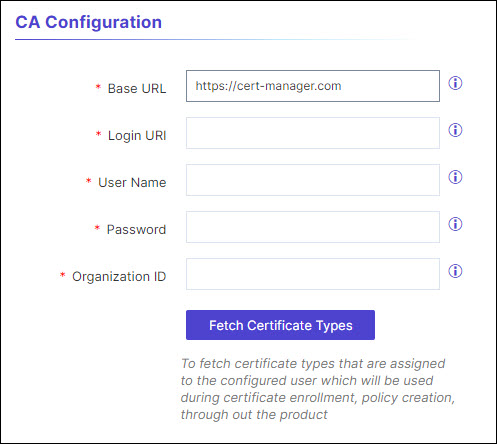
Table 2. CA Configuration - Field Description Table Name Description *Base URL This URL will contain the hostname of the Sectigo CA instance and used for constructing the API requests. *Login URI Provide the customer login URI for API authentication. *User Name Enter the Username of the Sectigo portal to communicate with the CA. *Password Enter the Password of the Sectigo portal to communicate with the CA. *Organization Id Enter the organization id used for the certificate lifecycle action. (You will find it in the Organization tab of the Sectigo portal) Note: The asterisk (*) symbol indicates a mandatory field. -
Click Fetch Certificate Types
The certificate types that are assigned to the configured user which will be used during certificate enrollment, policy creation, through out the product.
-
Update the following details in the Advanced Settings section as
described in the table.
Table 3. Advanced Settings - Field Description Table Name Description Poll after CSR Submission A check box field when selected will fetch the certificated immediately after CSR Submission on enrollment, renew, and reissue of certificate with the retry count and retry frequency as described below. *Retry Count The number of times the polling will take place after CSR submission. Enter a value between 1 and 10. *Retry Frequency The duration of the polling. enter the value between 1 and 30seconds Note: The asterisk (*) symbol indicates a mandatory field. -
Click Fetch Custom Attributes.
The attributes available for the CA account will be fetched from the Certificate Authority along with the CA and profile names.Note: The pop-up message is displayed as CA and profiles fetched.
-
Click Save.
The created Sectigo configuration settings will be added.Note: The pop-up message is displayed as <CA_name> Settings Added.