Configuring a ServiceNow Instance
- Go to the Integration Hub.
- On the Workflow > Integration page, click servicenow/change.
-
On the Vendor Configuration page that is displayed,
under Credentials, enter the required field information.
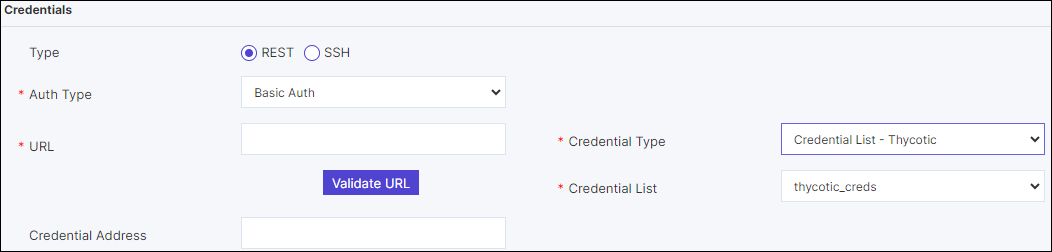 From the Auth type field, if you select Basic Auth and Credentials you can select the Credential Type from the dropdown and enter the relevant details to support credential authentication.
- In the Credential Type field, if Manual is selected, the enter the Username and Password.
- In the Credential Type field, if Credentail List - XYZ is
selected, then in the Credential List field, a list of
credentials from credential store will be displayed.
- If the Credential Type = Credentail List -
CyberArk, Credentail List - BeyondTrust an
additional field Credential Address is displayed. It
uniquely identifies the credential list.Note: The credentials must be added in the respective Device Inventory.
- If the Credential Type = Credentail List -
CyberArk, Credentail List - BeyondTrust an
additional field Credential Address is displayed. It
uniquely identifies the credential list.
-
Under General Settings, define the relevant field
information.

| Field | Description |
|---|---|
| Enable polling | Allows you to enable periodic polling when integrated with an ITSM system. |
| Polling Interval (mins) | Allows you to define the frequency of polling interval when integrated with an ITSM system. |
| Device / CI validation | Allows you to validate for any mismatch between device/CI (configuration item) details between the AppViewX work order and the change ticket at the time of the work order approval and implementation. |
| Timezone | Allows you to select the timezone from the list. |
| Approve mode | Allows you to enable either a ‘hard stop’ or ‘override’ (the work order) in the event of any mismatch between the AppViewX work order and the change ticket details at the time of work order approval, peer review. |
| Implementation mode | Allows you to enable either a ‘hard stop’ or ‘override’ (the work order) in the event of any mismatch between the AppViewX work order and the change ticket details at the time of work order implementation post all peer reviews. |
-
Define the Log/Configuration settings.

| Field | Description |
|---|---|
| Select configuration type |
Allows you to enable pushing of configuration commands and/or logs to the ITSM system. For example, pushing config and configurations to the ‘journal field’ on ServiceNow. |
| Auto close | Allows you to enable automatic ticket closure or otherwise on the ITSM system once the AppViewX work order is executed. |
-
Under Configurations, turn on the Enable config toggle and define
relevant API parameters in the JSON configurator that is displayed.
Sample Schema:
{ "ServiceNowConfig": { "serviceName": "ServiceNow", "serviceApiList": { "getTicket": { "url": "/api/now/table/change_request?sysparm_query=number=<ticketNumber>", "responseDataMapping": { "state": "result~approval", "startTime": "result~start_date", "endTime": "result~end_date", "sysId": "result~sys_id", "ticketNumber": "result~number" }, "apiListToCallAfter": [ "getDeviceList" ], "name": "getTicket", "method": "GET" }, "getDeviceList": { "url": "/api/now/table/task_ci?sysparm_display_value=true&sysparm_query=task=<sysId>", "responseDataMapping": { "deviceList": "result~ci_item~display_value" }, "name": "getDeviceList", "method": "GET" }, "closeTicket": { "url": "/api/now/table/change_request/<sysId>", "responseDataMapping": { "state": "result~state" }, "payloadDataMapping": { "state": "closureCode", "close_notes": "comment" }, "name": "closeTicket", "method": "PUT" }, "updateTicket": { "url": "/api/now/table/change_request/<sysId>", "responseDataMapping": {}, "payloadDataMapping": { "work_notes": "updateData" }, "name": "updateTicket", "method": "PUT" } }, "validation": { "state": "approved" }, "tooltipData": { "Affected CI's": "deviceList", "Start Date": "startDate", "End Date": "endDate", "Status": "state" }, "authorizationConfig": { "type": "Basic" }, "mandatoryHeaders": { "Content-Type": "application/json" }, "constants": { "ticketCloseStates": { "Success": 3, "Not implemented": 4, "Withdrawn": 7 }, "dateFormat": "yyyy-MM-dd HH:mm:ss" } } } - Click Add.