Alert Management
Create an ADC Alert
To create an ADC alert:
- Go to Menu > ADC+ > ALERTS & LOGS > Alerts.
-
Click
(Settings) icon on the top.
- On the Settings screen that opens, click the ADC tab if it is not already open.
- In the Alert name box, enter a name for the alert.
- In the Alert message field, enter the message that users will receive for the alert.
-
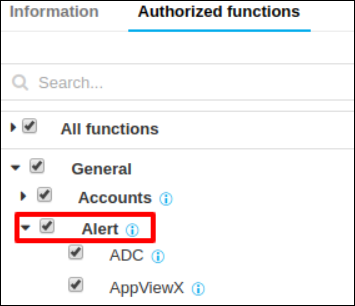
In the Trigger region, in the Alert category field,
you can choose from Threshold Alert, Application Alert, and
Device Alert.
Note: Rather than adding objects manually, you can click the Add search string link and create a search string that automatically assigns all existing objects that match the filter criteria to the alert. The benefit of using a search string rather than selecting objects manually is that the search string continues to work in the background, auto-assigning all new objects to the alert if the objects match the search criteria you set up.
-
From the Alert severity dropdown list, select one of the following
options:
-
Critical - For issues that are causing disastrous results or impacts on functionality. These are top priorities and must be resolved immediately.
-
Fatal - For issues that can cause disastrous results or impacts on functionality. These are a major priority and should be resolved soon.
-
Major - For issues that are important and require a resolution, but that is not the highest priority.
-
Minor - For issues that are of low priority and need a resolution.
-
Notification - For issues that are not alerts or warnings, but which must eventually be addressed.
-
- In the Vendor field, select from the vendor whose device or devices you want to set an alert for.
-
In the Object type field, select the vendor object that you want to
set an alert for.
The contents of this field vary depending on the vendor you selected in the previous step.
-
In the Available field, click the
(Assign) icon beside each object/device you want to add to the alert.
The following Alert conditions are applicable only for the Threshold alert.Note: To add another condition to the alert, click the (Add) button, then in the Logic field select AND or OR to define the relationship between the first condition and the second. AND relationships require both conditions to be met for an alert to be sent, OR relationships require that only one condition be met for an alert to be sent. Only based on the above user-defined conditions, threshold alerts will be raised in AppViewX.- In the Alert interval field, select how often you want the system to check for breaches of the threshold levels that you are about to define.
- Checks can be set to occur every 10, 20, 30, 40, 50, or 60 seconds.In the Cool off the period field, select how much time the system should wait before sending another alert about a continuing threshold breach: 10, 20, or 30 minutes.
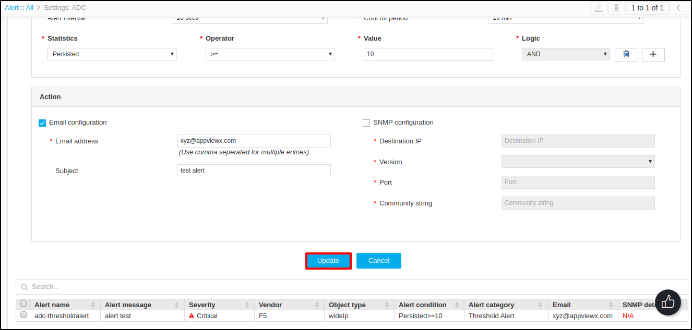
- In the Statistics field, define the conditions that will generate an alert by selecting values in the Statistics, Operator, and Value fields.
-
To send an email alert, SMTP must be configured. Refer to the Configure SMTP for Email Alerting
topic for details on how to do this. When you have finished, complete the
following steps to use email as an alert method:
- Select the Email Configuration checkbox.
- In the Email Address field, enter email addresses to send the alert. Use commas to separate the addresses.
- In the Subject field, leave the default text or enter the text that briefly describes the kind of alert the user is receiving in their Inbox.
-
To use the Simple Network Management Protocol (SNMP) to send the
alert, complete the following steps:
-
Enter the Destination IP for the alert.
-
Select the Version of SNMP you want to use: V1 or V2.
-
Enter the port of the alert that should be used for the alert.
-
Enter the Community String for the alert. The string is similar to a user ID or password and allows users to access the requested information on the device.
-
-
Click Add to save the alert to the AppViewX system.
Note: For the Application and Device alert, when any user executes changes on the configured application/device(s), AppViewX sends a notification based on the appropriate actions associated with the alert (Email/SNMP). Only the changes that are executed via AppViewX will be tracked and notified.
Create a Syslog Alert
AppViewX subscribes to all device-level logs, where it acts as a syslog listener. The logs of any
devices added in AppViewX can be viewed as syslog by navigating to Logging->Syslog. However, devices tend to generate huge amounts of data, a Syslog alert is a convenient way to get notified about a specific event that is of importance to you. It also allows for a closed loop remediation by associating workflows.
To create a syslog alert:
- Go to Menu > ADC+ > ALERTS & LOGS > Alerts.
-
Click on
(Settings) icon, and then Syslog tab.
- Provide an Alert Name and Message.
- Mention the Severity, it could be one or multiple.
- Configure the critical Device/Applications that need to be monitored.
- Add the Pattern/Regex that needs to be monitored on the Syslog received. Multiple strings can be provided with comma-separated, which will be considered as Boolean AND operator.
-
Following are some of the alerts that can be configured,
-
Sample syslog - <133>Sep 19 04:24:38 bigip-40-152 notice mcpd[6046]: 01070417:5: AUDIT - user admin - transaction #84153993-4 - object 0 - create { virtual_server_profile { virtual_server_profile_vs_name \"/Common/testVs\" virtual_server_profile_profile_name \"/Common/tcp\" virtual_server_profile_profile_type 5 virtual_server_profile_profile_context 0 } } [Status=Command OK]\n
-
For instance, if the Syslog alert is configured for the object and the Regex pattern is given as “create” Whenever an object is created and a Syslog is received for that object as above. An alert will be raised for the same and notified to the user.
-
- You can also pass certain metadata from the alert to the workflow. In the Metadata section, enter a key and its associated value in the respective fields. This is the additional information that will be used by the workflow that is going to be associated with.
- Associate any out of the box or custom workflow that needs to be executed on the occurrence of a configured Syslog event.
- Configure multiple Alerts as needed and Add it to the Grid. The configured Alerts could be modified or deleted anytime by selecting the Alert from the grid.
Change alert settings
- Log in to the AppViewX application with valid credentials.
- Go to Menu > ADC+ > ALERTS & LOGS > Alerts.
-
Click on the Settings button.

- To modify the alert settings of a particular alert type click on the corresponding tab. For example ADC or Syslog.
- Select an alert from the table and the modify button in the top right cornea will be enabled.
-
Click on the Modify button and make the required changes.
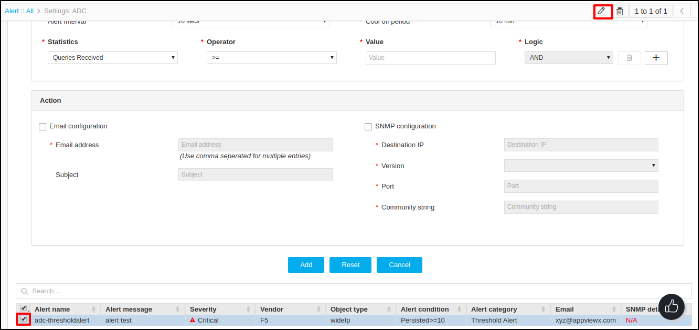
-
Click Update.
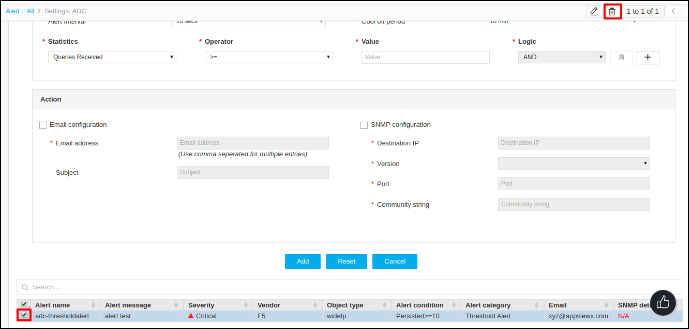
Deleting alerts
- Log in to the AppViewX application with valid credentials.
- Go to Menu > ADC+ > ALERTS & LOGS > Alerts.
-
Click on the Settings button.
- To delete the alert settings of a particular alert type click on the corresponding tab. For example ADC or Syslog.
- Select an alert from the table and the delete button in the top right corner will be enabled.
-
Click Delete.