Add a Device
To add a device to the AppViewX system:
-
Click
 and select
Inventory > Device.
The Device screen opens.
and select
Inventory > Device.
The Device screen opens. -
On the top of the screen, click the tab that corresponds to the type of device you want
to add: ADC, server, DNS, firewall, WAF, switch, router, proxy, cloud, HSM, others, or
MDM.
Note:
- To manage the Amazon ELB devices, ensure that the proxy is configured in the Settings module. For detailed information, refer to theProxy Settingssection of this guide.
- Servers should be added only with the root user credentials who can access all the files. Also, in the Credentials pane, users should select sudo or dzdo from the Access Elevation section.
-
Click
 in the Command bar.
- In the left-hand column on the Add screen that appears, select the vendor whose device you want to add.
- At a minimum, fill in all fields that contain a red asterisk beside their names.
-
Click Save.
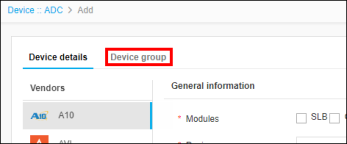
Note: In some instances, such as when adding ADC devices, a second tab must be clicked and its fields completed before the device can be added to the AppViewX system. Before leaving the Add screen, check to see if there are additional tabs you need to click, like the Device group tab in the image below.