Templates
- This module is available starting from the Thames HF2 (2024.0.2.0) release for those using AppViewX PKIaaS Native CA for PKI initialization.
- For versions prior to Thames FP1 HF3, enable Templates function by going
to
 (Menu) icon > Platform > Role. Search
for the created administrator role and click the link. Switch to the
Authorized functions tab, and select the Templates check box
in the PKI module.
(Menu) icon > Platform > Role. Search
for the created administrator role and click the link. Switch to the
Authorized functions tab, and select the Templates check box
in the PKI module.
You can either use any of the existing templates or create a customized template to specify certificate parameters.
Using Existing Templates
- Go to (Menu) icon > PKI+ >
Templates.
The Templates page is displayed with pre-existing templates to choose from.
- Select a template that best suits your needs and click the
 (Copy) icon in the Action column to create a copy of the
selected template.
(Copy) icon in the Action column to create a copy of the
selected template.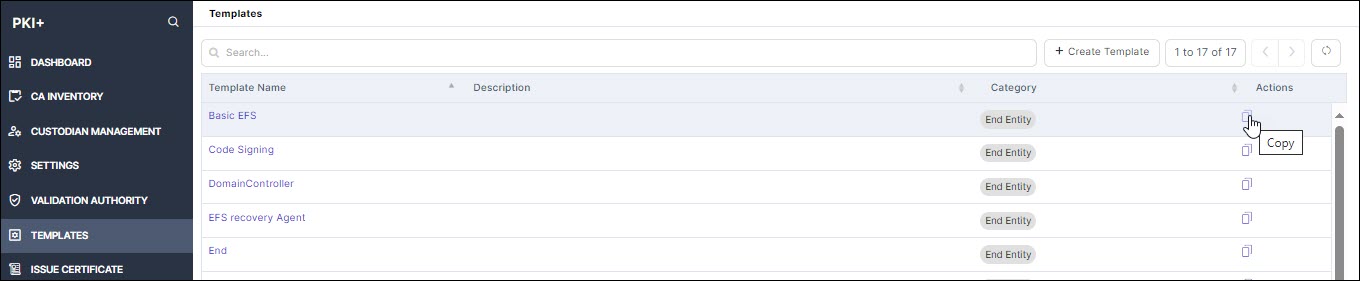
A copy of the selected template is displayed.
- Edit the fields and click Save.
The newly created template appears on the home page of Templates.
- To delete the template, click the Delete icon against the selected
template. Note: You can only delete the templates that you created.
Creating Custom Templates
You can create custom templates using AppViewX PKIaaS Native CA offers a wide range of benefits, including enhanced security, consistency, scalability, and ease of use. By aligning the certificate issuance process with your organization’s specific requirements, you can optimize the management of digital certificates and strengthen your overall PKI environment. Custom templates help ensure compliance, reduce errors, and streamline the certificate lifecycle, making the process more efficient and secure for your organization. You can either use any of the existing templates or create a customized template to specify certificate parameters.
- Click + Create Template on the top right corner of the screen.
The Templates page is displayed.
- Enter the following information:
Table 1. Field Description of Templates Section Field Description General *Template Name Provide a name for easy reference. Description Provide particulars on template creation as to who created it, when it was created, and why it was created. Category Select any of the options: - Root CA
- Sub CA
- End Entity (default value)
Note: This field is not editable once the template is created.Validity Offset This is the value provided to adjust the start date of certificate validity. By default, it is -10 minutes from the current time. Basic Constraint Details Critical Select this option to indicate the information in an extension is important. Key Usages Critical Select this option to indicate the information in an extension is important. Basekey Usage Select a value from the dropdown list that defines the functional purpose of the certificate. Extended Key Usages Critical Select this option to indicate the information in an extension is important. Extended Key Usage Select a value from the dropdown list that defines the application usage of the certificate. Enable Custom Select this option to provide custom EKU values in the text box below. Multiple entries must be separated by a comma. Custom Extensions Enable Custom Extensions Based on your organization needs, you can add more custom extensions that will be included in every certificate issued using this template. Field Description OID OIDs are used to define specific certificate policies in a Certification Practice Statement (CPS). Each policy has a unique OID. An OID (Object Identifier) is a globally unique identifier used to represent specific objects, attributes, or policies in systems like PKI, LDAP, SNMP, and more. It follows a dot-separated numeric format that uniquely identifies each object in a hierarchical structure.
Encoding Type Specifies the format in which the custom extension date is encoded. Select a value from the dropdown list based on your data requirements and usage context. Value Provide the field value. You can give any value for the provided custom OID. Critical Select this option to indicate the information in an extension is important. On clicking Add, the data is populated in a table.
Certificate Policy Enable Certificate Policy Certificate Policy specifies the policy under which a certificate was issued. On enabling it, the following fields are displayed. Field Description Inherited from CA Select this option to indicate it was inherited from CA. Critical Select this option to indicate the information in an extension is important. Additional Policies Enable this option if you want to create custom policies as CPS URI or User Notice Text. Provide OID, type, and value. Click Add for the data to be populated in a table. Subject Alternative Names Critical Select this option to indicate the information in an extension is important. Field Name Select value as DNSName, IPAddress, Email, or URI. Encoding Type Select a value from the dropdown list. Other Extensions Authority Key ID Sha1 hash of the issuer public key. By default, this is enabled. Subject Key ID Sha1 hash of the subject public key. Select hash value as 60 or 160 bit. By default, this is enabled. Enable CRLDP Enable to add CRLDP to the certificate for status verification. By default, this is enabled only for sub CA and end entity categories. CA defined CRL Distribution Point This field appears only for sub CA and end entity categories. This is selected when Enable CRLDP is enabled. Custom CRL Distribution Point URI This field appears only when Enable CRLDP is enabled. Provide custom CRL URLs in the text box below. Multiple entries must be separated by a comma. Enable AIA By default, this is enabled for sub CA and end entity categories. Issuer Certificate download link This field appears only for sub CA and end entity categories. You can disable this option to remove the issuer certificate link from the certificates issued using this link. CA defined OCSP link By default, this is enabled for sub CA and end entity categories. Enable this for issuer defined OCSP. Custom OCSP URI Enable this for user defined OCSP. Select this option to provide custom OCSP URLs in the text box below. Multiple entries must be separated by a comma. - Click Save.
The newly created template appears on the home page of Templates.