Designing a Workflow 
The following options are available when designing a new workflow:
- Provision to design a new workflow and assign a category and a sub category.
- Provision to search and view the inventory of tasks by category.
- Provision to drag and drop in-built, custom tasks to design a workflow.
- Provision to clone existing tasks and use them in a workflow.
- Provision to delete tasks.
- Provision to link and update existing links and connect tasks within a workflow.
- Provision to validate a workflow for errors.
- Provision to assign a workflow to user role(s).
- Provision to enable or disable a workflow.
- Provision to bookmark workflow task(s).
- Provision to preview a workflow task.
- Provision to preview a workflow/nested workflow.
- Provision to reuse and/or import workflow and workflow task(s).
To design a new workflow:
- Go to the Workflow page.
-
On the Workflow page (Card view), click
Create New.
Tip:When the Workflow inventory page is in List View, you can click
 (Add) icon in the command bar to design a new workflow.
 -
In the workflow design space, enter or select the requested field information.
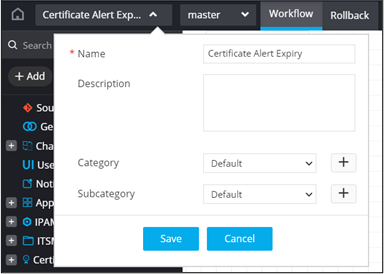
Table 1. Field descriptions for workflow design space Field Description *Name Enter a name for the workflow. Description Enter a description for the workflow. Category Select a category from the options displayed in the dropdown. Note:You can create a new category by clicking
(Add) icon.Subcategory Select a subcategory from the options displayed in the dropdown. Note:You can create a new subcategory by clicking
(Add) icon.* : Mandatory fields - Click Save.
-
Drag and drop tasks from the folders in
the menu on the left to design workflows from scratch.
Note:For more information on getting started quickly with building workflows, click here.