Sectigo CA
Prerequisites
- To create a CA configuration the following values are required:
- Base URL
- Login URI
- Username (The new administrator’s login name. Refer point 2.)
- Password
- Organization ID (Refer point 4.)
Once your organization has subscribed for a Sectigo account, you will be provided with a Username, Password, and Login URL for SCM (Sectigo Certificate Manager). The default format of this URL is https://cert-manager.com/customer/<customer URI>/, where <customer URI> is a path segment specific to your company.
- The Username and Password should be of the following administrators:
- Master Registration Authority Officer (MRAO)
- Registration Authority Officer (RAO)
- The above administrators should have the following privileges.
Privileges Allow SSL details changing Enables the new MRAO, RAO SSL, and DRAO SSL to change the details of SSL certificates by navigating to Certificates > SSL Certificates. Allow SSL auto approve SSL certificates requested by the MRAO are automatically approved, and those requested by a RAO SSL and DRAO SSL are automatically approved by the administrator of same level and await approval from higher level administrator. To review the administrator details in the SCM, navigate to Settings > Admins, select the administrator in the list, and click Edit. This displays the Edit Client Admin dialog, Add/Edit the necessary privileges and click Save.
- Organization Id: Organizations are umbrella entities created by
administrators for the purposes of requesting, issuing, and managing
certificates for domains and employees. The Organizations page is used to
add and modify the organizations.
To review the organization details in the SCM, navigate to Organizations, select the organization in the list, and click Edit. This displays the Edit Organization dialog shown in the following illustration.
Configuring Sectigo CA
-
Go to
 (Menu) > SIGN+ > ADMINISTRATION > Certificate
Authority.
(Menu) > SIGN+ > ADMINISTRATION > Certificate
Authority.
-
From the displayed CA, select Symantec.
The Sectigo home page is displayed.
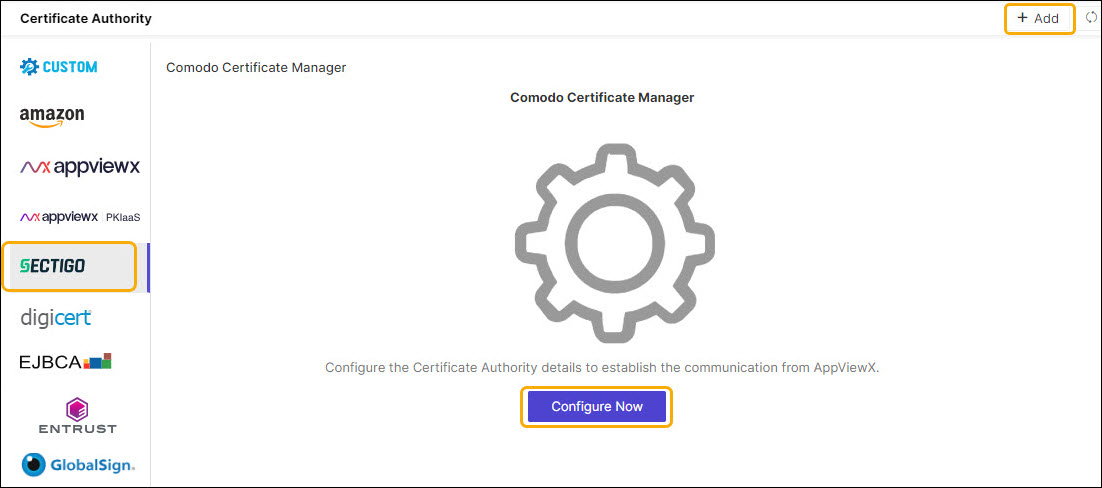
- (Optional if creating for the first time) Select the Comodo Certificate Manager tab.
-
Click the Configure Now button or +Add icon from the middle
or top-right of the page respectively.
The Sectigo CA details page is displayed.
-
Update the following details in the General Information section as
described in the table:
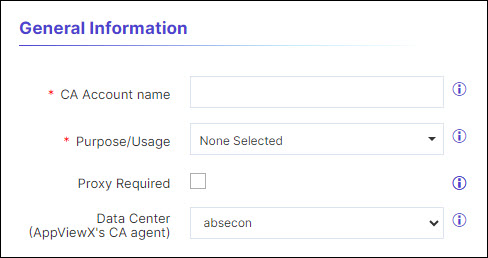
Table 1. General Information - Field Description Table Fields Description *CA Account name A unique name to identify the CA setting. Note: No special characters other than ‘.’, ‘-’,’_’ are allowed. Names should not start with special characters.
*Purpose/Usage Certificate Type for which CLM actions will be enabled. Example: Server and Client.
Proxy Required Enable this field if the CA communication needs to happen via Proxy. The proxy details configured in general settings will be used for communication. Data Center (AppViewX's CA agent) Select the data center through which the CA communication needs to happen. *: Mandatory fields -
Update the following details in the CA Configuration section as
described in the table. These fields are necessary for invoking the Sectigo
CA APIs for Certificate Management.
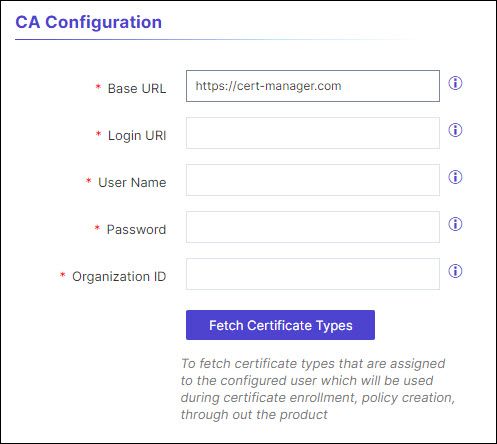
Table 2. CA Configuration - Field Description Table Fields Description *Base URL This URL will contain the hostname of the Sectigo CA instance and used for constructing the API requests. *Login URI Provide the customer login URI for API authentication. *User Name Enter the Username of the Sectigo portal to communicate with the CA. *Password Enter the Password of the Sectigo portal to communicate with the CA. *Organization Id Enter the organization id used for the certificate lifecycle action. (You will find it in the Organization tab of the Sectigo portal) *: Mandatory fields -
Click Fetch Certificate Types
The certificate types that are assigned to the configured user which will be used during certificate enrollment, policy creation, through out the product.
-
Update the following details in the Advanced Settings section as
described in the table.
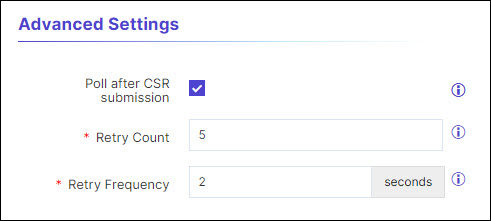
Table 3. Advanced Settings - Field Description Table Fields Description Poll after CSR Submission A check box field when selected will fetch the certificated immediately after CSR Submission on enrollment, renew, and reissue of certificate with the retry count and retry frequency as described below. *Retry Count The number of times the polling will take place after CSR submission. Enter a value between 1 and 10. *Retry Frequency The duration of the polling. enter the value between 1 and 30seconds *: Mandatory fields -
Click Fetch Custom Attributes.
The attributes available for the CA account will be fetched from the Certificate Authority along with the CA and profile names. A pop-up message is displayed as CA and profiles fetched.
-
Click Save.
The created Sectigo configuration settings will be added. The pop-up message is displayed as <CA_name> Settings Added.
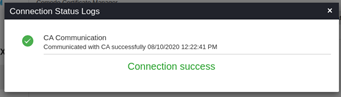
Validating Sectigo CA
-
Go to
(Menu) > SIGN+ > ADMINISTRATION > Certificate
Authority.
- From the displayed CA, select Sectigo.
-
In the Status column of the grid with the listed accounts, click
Check to validate the CA setting that has been
created.
The CA communication will be validated and the Connection Status will be shown as either Success or Failure.