Integrating Code Signing in Atlassian Bamboo Pipeline
Bamboo
- Automated building and testing of software source-code status
- Updates on successful and failed builds
- Reporting tools for statistical analysis.
Bamboo Pipeline
Here are the key components and concepts associated with Bamboo
pipelines:
- Stages: A pipeline is typically divided into stages, each representing a phase in the CI/CD process. Common stages include "Build," "Test," "Deploy to Staging," and "Deploy to Production." Stages are executed sequentially, and each stage may consist of one or more jobs.
- Jobs: Within each stage, you define one or more jobs. A job is a collection of tasks that need to be executed together. For example, a "Build" stage might have a single job that compiles source code, runs unit tests, and packages the application. Bamboo provides a wide range of built-in tasks and supports custom scripts and commands.
- Tasks: Tasks are individual steps within a job that perform specific actions, such as running a script, checking out code from a version control system, or publishing artifacts. Bamboo offers a variety of task types to accommodate different actions.
- Triggers: Pipelines can be triggered manually or automatically based on events. Automatic triggers can be set up to start a pipeline when code is pushed to a version control repository, ensuring that new changes are continuously integrated and tested.
- Branches: Bamboo pipelines can be configured to work with different branches of your version control repository. This allows you to have separate CI/CD pipelines for different development branches, such as feature branches or release branches.
- Artifacts: Bamboo allows you to manage and store build artifacts generated during the pipeline, making it easy to distribute them to different environments or store them for future reference.
- Notifications: Bamboo can send notifications and reports about pipeline results to team members via email, chat, or other communication channels.
- Parallel Execution: Bamboo supports parallel execution of tasks and jobs within a stage, enabling faster build and test times by taking advantage of available resources.
Bamboo Configuration File
Some of the key configuration files and
directories in Bamboo are:
- Bamboo Home Directory (BAMBOO_HOME): This directory contains many
of the configuration files and data for Bamboo. The specific location
and structure may vary based on your installation. Important
subdirectories and files include:
- xml-data/: Contains various XML configuration files
- lib/: May include libraries and JAR files for custom plugins and extensions
- agent/: Configuration files and data specific to Bamboo agents.
- Bamboo Agent Configuration: Each Bamboo agent has its own
configuration file named “bamboo-agent.cfg.xml”. This file contains
agent-specific settings, including the Bamboo server connection details.
Sample bamboo-agent.cfg.xml:
<?xml version="1.0" encoding="UTF-8"?>

<bamboo-agent>
    <!-- Bamboo server URL -->
    <serverUrl>http://bamboo-server:8085</serverUrl>

    <!-- Bamboo agent's unique identifier -->
    <agentUuid>YOUR_AGENT_UUID</agentUuid>

    <!-- Bamboo agent's display name -->
    <agentName>My Bamboo Agent</agentName>

    <!-- Bamboo agent's capabilities -->
    <capabilities>
        <!-- Example capability for Maven -->
        <capability name="system.builder.mvn3.Maven 3" value="/usr/local/apache-maven-3.8.1" />

        <!-- Example capability for Node.js -->
        <capability name="system.builder.node.Node.js" value="/usr/local/bin/node" />
    </capabilities>

    <!-- Bamboo agent's working directory -->
    <workingDir>/path/to/agent/work</workingDir>

    <!-- Bamboo agent's temp directory -->
    <tempDir>/path/to/agent/temp</tempDir>

    <!-- Bamboo agent's home directory -->
    <homeDir>/path/to/agent/home</homeDir>

    <!-- Bamboo agent's capabilities sharing method (usually "true" or "false") -->
    <sharingCapability>true</sharingCapability>

    <!-- Bamboo agent's environment variables -->
    <environmentVariables>
        <environmentVariable name="PATH" value="/usr/local/bin:/usr/bin:/bin" />
        <environmentVariable name="JAVA_HOME" value="/usr/local/jdk1.8.0_291" />
    </environmentVariables>

    <!-- Bamboo agent's security token (if required) -->
    <securityToken>YOUR_SECURITY_TOKEN</securityToken>
</bamboo-agent>
Configuring the Bamboo Pipeline Environment
-
Create or Open a Bamboo Plan:
- Login to the Bamboo instance and create a new plan or open an existing one where the code signing has to be integrated.
-
Add a Script Task:
- Within the Bamboo plan, add a new Script task to one of the existing jobs or create a new job for this purpose. This task will run the jarsigner command.
- Set the interpreter to "Windows PowerShell" if using a Windows agent or set the interpreter to "Shell" if using a Linux agent.
-
Configure the Script Task for Integration with AppViewX
CSP/PKCS#11:
In the Script Body section of the Script task configuration, add the required commands to sign the artifacts based on requirement.
-
Save and Execute:
- Save the Script task configuration.
- Trigger a Bamboo build for the plan or setup webhooks to trigger the task based on code commit or any other events based on configuration.
Prerequisites
- The pipeline should be configured with the required Build stages and the required artifacts should be ready for signing.
- Copied the downloaded SIGN+_Package to the configured runner machine or agent and installed the package.
- Ensure the connectivity from the runner machine to the SIGN+ API Connector URL Node (Compute Cluster, Cloud Connector, LoadBalancer or OnPrem Worker Node).
Sample Script Configuration using AppViewX CSP and Signtool in Bamboo Dashboard
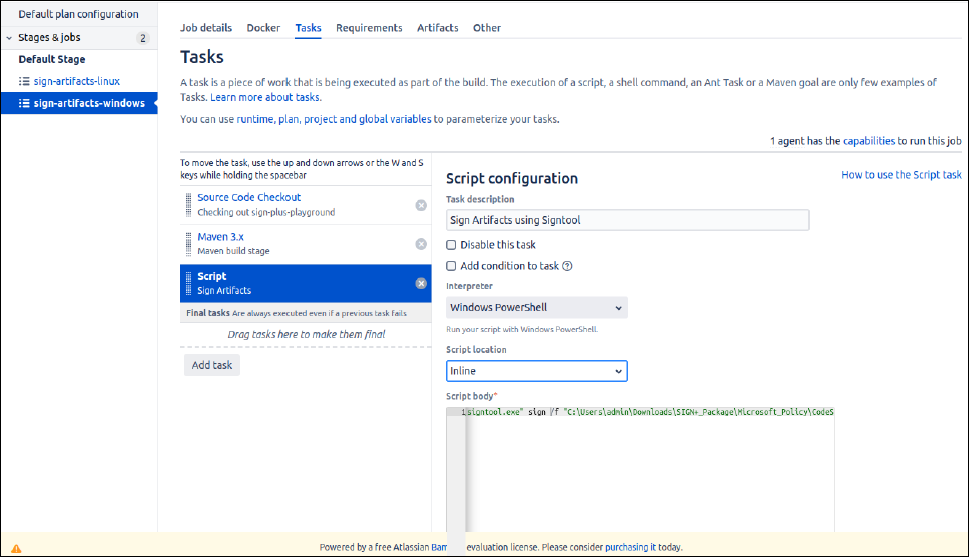
Using Signtool with AppViewX CSP
- Execute the AppViewX SIGN+ Installer executable in the configured runner machine to install the prerequisites required to use the AppViewX CSP/PKCS11 Providers.
-
Copy the
signtoolcommand generated in the README File after installation and update the Script Section with the generated command.signtool.exe sign /f <path to certificate> /fd <digest algorithm> /csp <csp_name> /k <key_alias_name> /tr <timestamp_url> /td <timestamp digest algorithm> <input_file_path>- /f <path to certificate>: Path to your code-signing certificate.
- /fd <digest algorithm>: Specifies the hashing algorithm.
- /csp <csp_name>: Name of Cryptographic Service Provider (CSP).
- /k <key_alias_name>: Key Container Name.
- /tr <timestamp_url>: Provides a timestamp from a trusted timestamping authority.
- /tr <timestamp_digest>: Specifies the timestamping Digest algorithm.
- <input_file_path>: Path to the file to be signed.
Using JarSigner with AppViewX CSP
- Execute the AppViewX SIGN+ Installer executable in the configured runner machine to install the prerequisites required to use the AppViewX CSP/PKCS11 Providers.
-
Copy the
Jarsignercommand generated in the README File and update the Script Section with the generated command.
The <time_stamp_url>, <signature algorithm> and <keypair alias> parameters are auto generated in the README after running the SIGN+ Installer.jarsigner.exe -verbose -storetype "Windows-My" -keyStore NONE -tsa <time_stamp_url> <input_file_path> -signedjar <output_file_path> -sigalg <signature algorithm> <keypair alias>
Using Nuget with AppViewX CSP
- Execute the AppViewX SIGN+ Installer executable in the configured runner machine to install the prerequisites required to use the AppViewX CSP/PKCS11 Providers.
-
Copy the
nugetcommand generated in the README File and update the Script Section with the generated command.
The <time_stamp_url>, <certificate_fingerprint> and <hashing_algorithm> parameters are auto generated in the README after running the SIGN+ Installer.nuget.exe sign <input_file_path> -Timestamper <timestamp_url> -CertificateFingerprint <certificate_fingerprint> -HashAlgorithm <hashing_algorithm> -Verbosity detailed -Overwrite
Using JarSigner with AppViewX PKCS#11 Provider
- Execute the AppViewX SIGN+ Installer executable in the configured runner machine to install the prerequisites required to use the AppViewX CSP/PKCS11 Providers.
-
Copy the
Jarsignercommand generated in the README File and update the Script Section with the generated command.
The <path to AVXPKCS11V1.cfg>, <time_stamp_url>, <signature algorithm> and <keypair alias> parameters are auto generated in the README after running the SIGN+ Installer.jarsigner -verbose -keystore NONE -storetype PKCS11 -certs -providerclass sun.security.pkcs11.SunPKCS11 -providerArg <path to AVXPKCS11V1.cfg> <input_file_path> -signedjar <output_file_path> -tsa <time_stamp_url> -sigalg <signature algorithm> <keypairalias>
Using JSign with AppViewX PKCS#11 Provider
- Execute the AppViewX SIGN+ Installer executable in the configured runner machine to install the prerequisites required to use the AppViewX CSP/PKCS11 Providers.
-
Copy the
JSigncommand generated in the README File and update the Script Section with the generated command.
The <path to AVXPKCS11V1.cfg>, <keypair alias>, <digest algorithm>, <timestamp url> parameters are auto generated based on the signing policy configurations in the README after running the SIGN+ Installer.java -jar <path_to_jsign_jar> --keystore <path to AVXPKCS11V1.cfg> --storetype PKCS11 --storepass 12345678 --alias <keypair alias> --alg <digest algorithm> --tsaurl <timestamp url> <input_file_path>
Using APKSigner with AppViewX PKCS#11 Provider
- Execute the AppViewX SIGN+ Installer executable in the configured runner machine to install the prerequisites required to use the AppViewX CSP/PKCS11 Providers.
-
Copy the
APKSignercommand generated in the README File and update the Script Section with the generated command.
The <path to AVXPKCS11V1.cfg>, <keypair alias> parameters are auto generated based on the signing policy configurations in the README after running the SIGN+ Installer.java -jar <path_to_apk_signer_jar> sign --provider-class sun.security.pkcs11.SunPKCS11 --provider-arg <path to AVXPKCS11V1.cfg> --ks NONE --ks-type PKCS11 --ks-pass pass:12345678 --ks-key-alias <keypair alias> --in "<input_file_path>" --out "<output_file_path>" --v1-signing-enabled false --v2-signing-enabled false --v3-signing-enabled true --v4-signing-enabled falseNote: The script can be configured to sign with any tool using the commands generated in the README File based on requirement.