Upgrading AppViewX
-
Go to the user home directory and untar the .tar.gz upgrade package by entering the
following command:
$ cd <user_home_directory> && tar -xvf appviewx_2019.4.0_BXX_RXXXX.tar.gz - Go to the installer directory by executing the following command:
$ cd installer -
Move appviewx_addons.tar.gz to the installer directory using the
following command:
mv ../appviewx_addons.tar.gz. - Once moved, complete the steps provided in this section.
-
Type the command
lsto verify the existence of the following files: AppViewX.tar.gz, installer.sh, copy_ssh_key.py, plugins.meta.sample, and appviewx.conf. Note: To proceed with the new configuration, you need to follow steps 4 to 13. If not, it will proceed with the old configuration setup. If you are upgrading from a version below 12.0., you have to follow the new configuration steps. Old configuration steps will not work for versions below 12.0.
 -
Go to the plugins.meta.sample file using the following command:
$ vi plugins.meta.sample -
Update the ports where platform plugins are going to be installed.
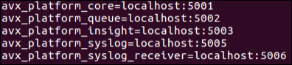
-
Update the ports where subsystem plugins are going to be installed.

-
Update the ports where vendor plugins are going to be installed.

-
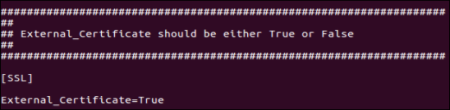
Update the external_certificate upgrade configuration to True if an external
certificate is already in use. Update the external_certificate upgrade configuration to
False if a self-signed certificate is already in use.
-
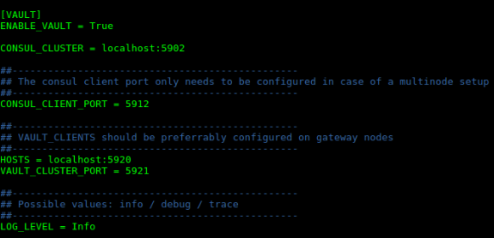
Set the ENABLE_VAULT field in the VAULT section to TRUE and update
the following fields to install the consul and vault components:
Note: If the existing AppViewX version is 12.4.0 or later, make sure you update the VAULT section same as the existing version in the
appviewx.conffile.- CONSUL_CLUSTER
- CONSUL_CLIENT_PORT
- HOSTS
- VAULT_CLUSTER_PORT
- LOG_LEVEL
-
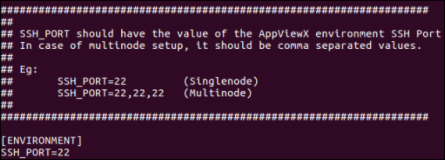
Update the custom SSH port configuration if required where default communication is
through port 22.
 For more details on how to configure syslog, refer to the Enable SYSLOGS Reception from Devices section of this guide.
 -
When you are done editing the fields, press the Esc key, then type
:wqto save and quit the file. - Rename the file to plugin.meta.
-
If the latest patches are available for particular versions, then the latest patch file
can be downloaded and applied. Download the patch file from the release portal and extract
it in the installer directory.

-
Trigger the migration process with the following command:
$
            ./installer.sh
Upon executing the install script, the user will be prompted with the following options:- Fresh Installation
- Migration CLI
- Migration GUI