CyberArk
Prerequisites for Integrating CyberArk with AppViewX
For links to the CyberArk documentation for installing and upgrading the PAM components, see the References section.
Configuring Credential Details for the CyberArk Vault
-
Go to Platform > VAULT & SECURITY > PAM.
The PAM page is displayed with a list of devices/objects/applications with Privileged Access Management.
- On the + Add credential page, select CyberArk from the left menu.
-
In the Credential details section, enter the required field
information.
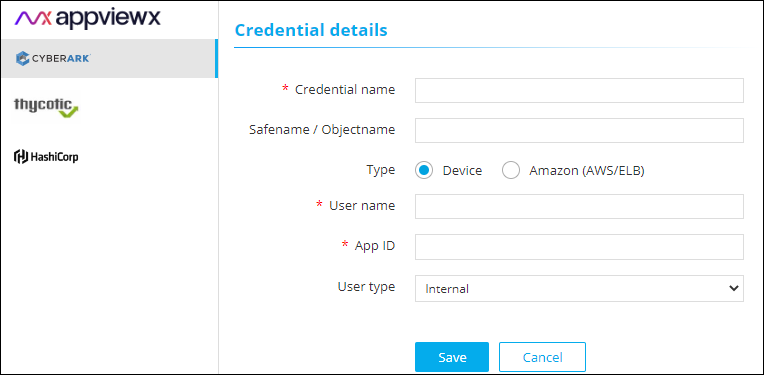
Table 1. Field descriptions for Credential details Field Description *Credential name Name the credential for users to identify it on the device addition page. Safename / Objectname Name of the safe/object in CyberArk Vault where the accounts are created in the CyberArk portal. This field is not mandatory. If not entered, it will search all the accounts. Type To retrieve a credential from the CyberArk vault, select one of the following options: - Device (default)
- Amazon (AWS/ELB).
*User name User name that has been used in CyberArk Accounts. Note: This field is displayed when the Device type is selected.*App ID App ID that has been created and authorized to provide access to CyberArk and retrieve credentials. Note: This field is displayed when the Device type is selected.User type From the drop-down menu, select one of the following: - Internal (user created directly/locally in the device for device management)
- External (user created in the LDAP Active Directory).
Note: *Server IP Address field is displayed when the User type is selected External.*Server IP Address The server IP Address has to be entered if the user has been created in an external active directory. It is utilized for integrating service accounts, particularly when external integration is required. By selecting "external," the input of the server's (LDAP/AD) IP address is taken, which manages the service account. Note: This field is displayed when the User type is selected as External.*AWS IAM username User name that has been added in CyberArk. Note: This field is displayed when the Amazon (AWS/ELB) type is selected.*AWS access key ID Access key ID generated from the AWS management console. Note: This field is displayed when the Amazon (AWS/ELB) type is selected.*: Mandatory fields - Click Save.
Steps for Integration
- On the Add credential page, select CyberArk from the left menu.
-
From the top right corner of the page, click CyberArk API
Settings.
The CyberArk API Settings pop-up window is displayed.
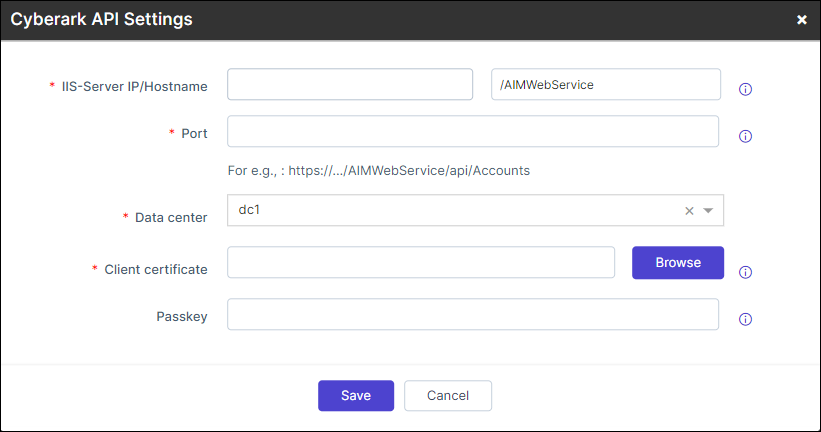
Table 2. Field descriptions for CyberArk API Settings Field Description *IIS-Server IP/Hostname Enter the API URL of the cloud machine hosting CyberArk in the format given below. https://<Hostname>:<Port><PathURI>/api/Accounts
If there is no pathURI parameter present then by default value /AIMWebService will be added.
*Port Port number on which CyberArk API's are exposed and servicable. *Data center Select the appropriate data center where the CyberArk components are located or managed. *Client certificate Upload the Client Certificate needed to authenticate/allow the CyberArk API service to communicate with AppViewX, this certificate needs to be configured in IIS server of the CCP application and the SN needs to be configured in Cyberark portal as well in the application config., supports only pfx format. *Passkey Enter the passkey for Client Certificates uploaded in the .pfx format. *: Mandatory fields -
Once the details are entered, click Update.
Note: Multiple vaults can not be added by configuring multiple profiles.