Configure a Traffic Grid Widget
To configure a Traffic grid widget on your dashboard:
-
If you are creating a Traffic grid widget as part of creating a new
dashboard, complete the steps in the Create a
Dashboard topic above, then jump to Step 5 below. If you are creating a Traffic
grid widget for an existing dashboard, click the
 (Add widget) button in the Command bar of the dashboard.
- On the Create widget screen that pops up, select the Traffic grid as the widget type.
- Enter a name for the widget.
- Click Create.
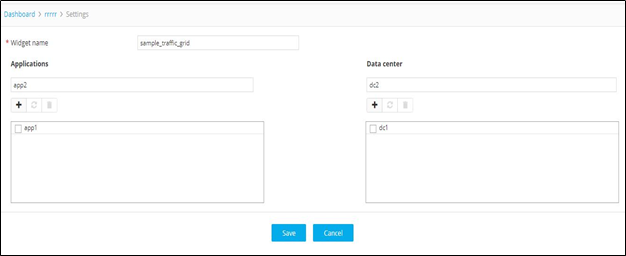
- On the Settings screen, enter the name of the application you want to monitor traffic for.
-
Click the
(Add) button to add the application to the list.
- Enter the names of the data center you want to configure traffic flows for.
-
Click the
(Add) button to add the data center to the list.
- Repeat steps 5-8 for each additional application and/or data center you want to include in the widget.
- Click Save.
 The widget then appears as a grid on the dashboard. Note that the applications and data centers display NA instead of statistics because they have not yet been configured.
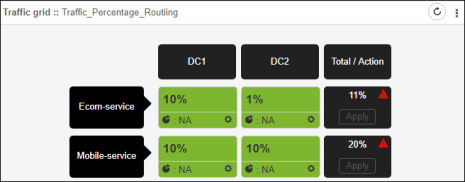
- Click the
(Settings) icon inside each Application/Datacenter cell of the grid to configure it.
-
The Settings screen appears, with the
Availability status tab displayed by default.

Table 1. Availability status Tab - Field and Description Table Field Description Vendor Select the vendor whose object you want to monitor availability in each data center. *Device state Select whether you want to monitor the traffic for a device that has a status of Active, Standby, or All, where "All" means devices with a status of either Active or Standby. *Object type Select the type of object that you want to add. The available options in this field depend on the selected vendor. Object Name start typing to see a list of named objects whose traffic you can monitor. When you see the one you want, move your cursor over it. and then click on it. *: Mandatory fields - Click Add.
- Repeat steps 12-13 for any other objects you want to monitor.
- After adding all the object types you want to monitor for availability, click Save.
-
Click the Traffic Percentage tab.
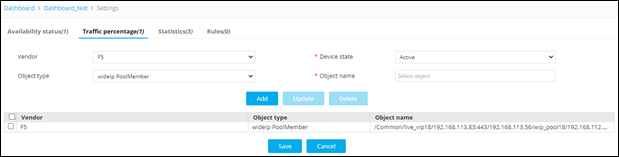
Table 2. Traffic percentage Tab - Field and Description Table Field Description Vendor Select the vendor whose object you want to monitor availability in each data center. *Device state Select whether you want to monitor the traffic for a device that has a status of Active, Standby, or All, where "All" means devices with a status of either Active or Standby. *Object type Select the object that you want to add. The options are wideIp Pool, wideIp PoolMember, or ItmPoolMember. Object Name Start typing to see a list of named objects whose traffic you can monitor. When you see the one you want, move your cursor over it. and then click on it. *: Mandatory fields - Click Add.
- Repeat steps 16 -17 for any other objects you want to monitor.
- After adding all the object types you want to monitor for availability, click Save.
-
Click the Statistics tab.
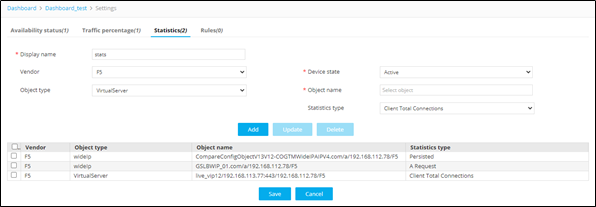
Table 3. Statistics Tab - Field and Description Table Field Description *Display name Enter the text you want to pop up when a user hovers over the  (Pie)
icon within a table cell of the widget. Note that only 10 characters can be
entered in the field, so the name must be brief, but descriptive.
(Pie)
icon within a table cell of the widget. Note that only 10 characters can be
entered in the field, so the name must be brief, but descriptive.Vendor Select the vendor whose object you want to generate statistics across all data centers. *Device state Select whether you want to generate statistics for a device that has a status of Active, Standby, or All. *Object type Select the kind of object you are adding: wideIp PoolMember or ItmPoolMember. Object Name Start typing to see a list of named objects whose statistics you can generate. When you see the one you want, move your cursor over it and click it. *: Mandatory fields - Click Add.
- Repeat steps 20 -21 for any other objects you want to generate statistics for.
- Click Save.
-
Click the Rules tab if you want to create rules that govern traffic
percentages for the widget.

- In the Rule type field, select one of the following options:
Warning: Warning - A warning rule causes a popup text box to appear if the user violates the restrictions defined by the rule, but the user can still complete the action. For example, if you create a rule that says a data center cannot receive more than 60% of the traffic on a device and a user tries to set the percentage for that data center to 65%, a warning pops up on the screen when the user clicks the
(Enter) icon in the table cell, as shown below. Despite the warning, the value 65 remains in the cell after the user closes the popup screen.
-
Restriction - A restriction rule causes a popup text box to appear if the user violates the restrictions defined by the rule. In this case, the user is unable to complete the action. For example, if you create a rule that says a data center cannot receive more than 60% of the traffic on a device and a user tries to set the percentage for that data center to 65%, a restriction screen pops up on the screen when the user clicks the
(Enter) icon in the table cell. When the user clicks OK to dismiss the popup, the percentage in the cell automatically reverts to its original value, erasing the user's entry of 65%.
-
Action - An action rule causes an event that you define to happen when the traffic percentage for a data center reaches a level or range that you define. The two main event types are Enable and Disable, so when the level you set is reached, an object or set of objects you selected is automatically enabled or disabled.
-
-
After creating rules for the widget, click Save.
For instructions on how to change the percentage values within the Traffic grid widget cells, refer to Change the Percentage Values Within a Traffic Grid Widget.