Microsoft Enterprise CA
Prerequisites
Following are the prerequisites for configuring Microsoft Enterprise CA in AppViewX
AppViewX Windows Gateway installer should be installed in a windows machine, running and reachable from AppViewX vendor plugin(s) through the Communication Modes described below.
| Communication mode | Category | Windows gateway machine | Microsoft CA |
|---|---|---|---|
| NATIVE API | User account type | Service account | Service account . |
| User permission |
Read, Request certificates, Issue and Manage certificates permission at CA level for the service account or the service account group or authenticated users Enroll permission at Certificate template level for the service account or the service account group or authenticated users |
||
| Services | RPC service |
RPC service certutil.exe command availability |
|
| Ports |
135 as the incoming port |
||
| POWERSHELL | User account type | Service account |
Service account. |
| User permission |
Full control permission to C:\Windows\Temp Read, Request certificates, Issue and Manage certificates permission at CA level for the service account or the service account group or authenticated users |
||
| Services | RPC Service, WinRM Service, WinRM Configuration, Powershell remoting,certutil.exe command availability |
RPC Service, WinRM Service, WinRM Configuration, Powershell remoting,certutil.exe command availability. |
|
| Ports |
5985 |
||
| WMI | User account type | Service account |
Service account |
| User permission |
Full control permission to C:\Windows\Temp Read, Request certificates, Issue and Manage certificates permission at CA level for the service account or the service account group or authenticated users |
||
| Services |
WMI service certutil.exe command availability |
WMI service certutil.exe command availability |
|
| Ports | NA. |
135, 445 or 139 |
Configuring Microsoft Enterprise CA
To configure the Microsoft enterprise CA:
- Go to > > > .
- Click the +Add icon on the top right of the page.
- Select the Microsoft in the left side vendor list, and then click the Enterprise tab.
-
Update the following details in the General Information section as
described in the table:
Table 2. General Information - Field and Description Table Name Description *CA Account name A unique name to identify the CA setting.
Note: No special characters other than ‘.’, ‘-’,’_’ are allowed. Names should not start with special characters.*Purpose/Usage Certificate Type for which CLM actions will be enabled. Example. Server, Client, Code Signing Proxy Required Enable this field if the CA communication needs to happen via Proxy. The proxy details configured in general settings will be used for communication. Data Center (AppViewX's CA agent) Select the data center through which the CA communication needs to happen. *: Mandatory fields -
Update the following details in the CA Configuration section as
described in the table.
Table 3. CA Configuration - Field and Description Table Name Description *Windows Gateway URL Enter the URL where the AppViewX agent is running. *Windows Gateway Type The mode of communication types from Windows Gateway machine to CA machine. Available types are NATIVE API, POWERSHELL, WMI. Refer Communication Mode Client Authentication Certificate The client certificate used while installing Windows Gateway. Users can use the default client certificate (ClientCertificateGateway.pfx) or the custom certificate given by the Customer. *Credential Type Type of credential to be used. Either Manual Entry or Credential List.
Username User name of the credentials. Password Password for the username. *: Mandatory fields -
Click Fetch CA Names to retrieve CAs accessible from Windows
Gateway installed machine.
Upon successful completion of Fetch CA Names, all reachable CAs listed in Select CA.
-
Click on one specific CA and proceed.
Table 4. Dynamic Fields for the Select CA Section Name Description Select CA All the reachable CAs are listed here. *CA Machine Hostname Host name of the CA Machine will be auto-filled. *CA Name Name of the CA chosen which will be auto-filled. CA Manager Approval Approves the pending enroll / Renew request submitted from AppViewX Certificate. *Time Zone To perform scheduled and Optimized CA discovery, please provide time zone value. *: Mandatory fields
Using Native API
- Configure the Template Details.Once CA is selected from the Select CA list, the Template details should have auto-filled.Note: If the desired template is not listed, it might not be published in AD. Users can add it manually through MS Template name and OID fields.
-
In the Template Details section, select/enter the details.
- Click Save.
Validating Microsoft Enterprise
Once the Microsoft Enterprise settings are added validation needs to be done to check whether the connection between AppViewX and Microsoft Enterprise is properly configured. To validate the Microsoft enterprise CA,
- Go to > > >
-
Select the InCommon in the left side vendor
list
The newly created and older settings are displayed in the grid.
-
Click Check to validate the CA setting that has been created.
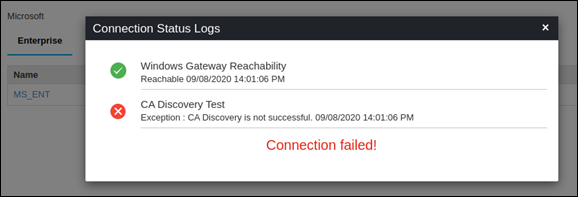
The CA communication will be validated and the Connection Status will be shown as either Success or Failure.Success Message.
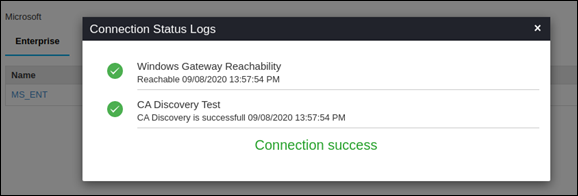 Success Scenario for Native API
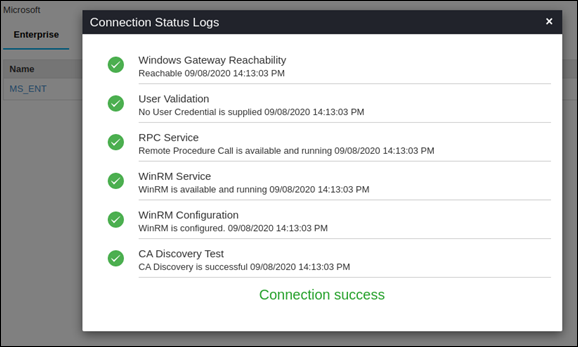 Success Scenario for Powershell
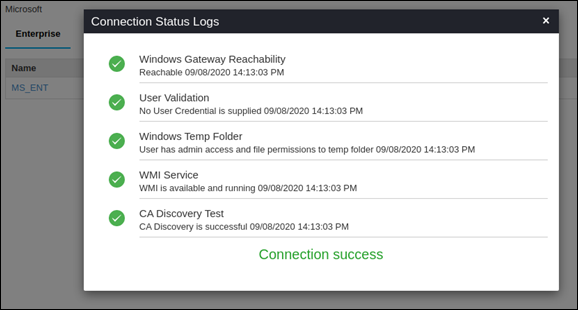 Success scenario for WMI