LDAP
-
Click Menu > Settings > General > Authentication >
Quick Config.
The Authentication screen opens with the LDAP sub-tab displayed by default.
-
Click Configure LDAP.
Configure LDAP popup window appears.
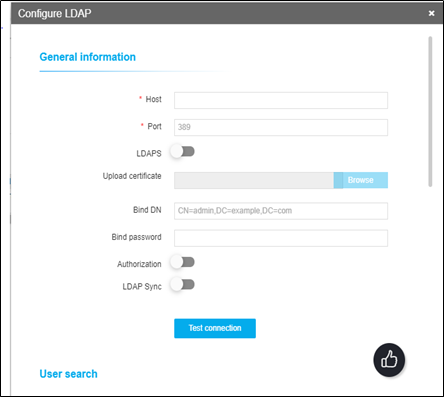
- In the Host field, enter the host address of the Active Directory (AD) server.
- The port for LDAP is displayed by default. It can be modified if necessary.
-
If you want to configure LDAPS, enable it by clicking the (Enabled) button.
The port for LDAPS will be displayed automatically. You can modify it if necessary.
- The Upload certificate field becomes clickable only when the LDAPS is enabled and then click the Browse button for the certificate you want to import.
- In the Bind DN field, enter the full distinguished name (DN), including the common name (CN), of an Active Directory user account that has privileges to search for users. For example, cn=manager,dc=sample,dc=com The Bind DN user, such as Administrator, is the username associated with the Bind DN user account. The Connector creates a corresponding user account as an administrative user in the Application Manager. You use the username for this account to log in to the Application Manager as an administrator. In AD DS, the Bind DN entry must be located in the same branch and below the Base DN.
- In the Bind Password field, enter the password associated with the Bind DN user account.
- You can enable Authorization to perform the validation on LDAP, leave it disabled if you want to perform the validation locally.
-
Click the Test connection button to ensure that the given host address is
reachable and the port is valid for configuring either an LDAP or LDAPS.
If the connection is successful, the following message is displayed: Test connection Success.Note: You can test the connection of LDAPS only when you save all of the configuration details. Bind DN and Bind password details cannot be validated through a test connection.
- In the Search base field within the User search region, enter the name of the search base object that defines the location in the directory from which the LDAP search begins. For example, ou=APPVIEWX,dc=sample,dc=com An LDAP search has the potential to retrieve information about all objects within a specific scope that have certain characteristics.
- In the search filter field, enter the filters you want to use to select the entries to be returned for a search operation. These are most commonly used with the LDAP search command-line utility. For example uid={0} The difference between uid and sAMAccountName is that uid should be unique throughout the directory namespace, while sAMAccountName is only guaranteed unique within the domain. If the AD tree has several domains, there is no guarantee of uniqueness across domains.
- In the User return attribute field, enter any special user attributes, such as displayID, that you want to synchronize between the local and global catalogs. Attributes associated with this type of entry can be specified, such as using the common name (CN) attribute to search for people with a specific common name.
- Click Test Query.
-
On the Test query input screen that appears, enter the following to perform the
search query validation:
- In the Test username field, enter any username available in the LDAP or LDAPS server that you are trying to configure.
- In the Test password field, enter the password associated with the username.
- Click Proceed to check if it is a valid user.
-
The next three fields on the tab, Group search base, Group search filter, and
Group return attribute, are related to those in steps 8–10 above. The difference
is that the search and fetch group membership details and also provide
authorization for the group that the user is associated with.
For example, enter ou=secgrp,dc=sample,dc=com for the Group search base, 'member=*' for the Group search filter, and cn for the Group return attribute.Note: The search filter 'member=*' matches any entry in the directory. Since every entry is a member, and the member attribute is always indexed, this is a useful search filter to return every entry.
- Click Test Query to check if it is a valid group.
-
In the Authorization map field, select how you want to map the return
attribute:
- Select the User group radio button to map the attribute to the user group.
- Select the Role radio button to map the attribute to the role.
- Click Save to save the LDAP or LDAPS configuration and have it added to the list at the LDAP Inventory table.
Note: To delete an existing configuration in the LDAP inventory table, select the required LDAP configuration using the Select checkbox beside the respective configuration. Click on More Actions and from the drop-down options, click Delete.Note: To update an existing configuration in the LDAP inventory table, click on the Host Hyperlink, on the Modify LDAP popup window, update the required details. Then, click Update. - In the table, click Fetch User Groups that exist as the second column to view the user groups available in the AD and create or map them with the existing user groups in AppViewX.
- In the popup screen that appears, fetch user groups specific to a user option selected by default, then type the username of an AD user.
- To pull specific user groups by user group name from AD into AppViewX based on specific patterns/keywords/code, select Fetch User Groups option, then type the user group name in AD.
- Either an exact group name or using a wild character search(asterisk (*) - matches any number of characters. You can use * anywhere in a character string).
- For example, to search User groups names containing ‘admin’, type user group name as ‘admin*’ in the search text box. All the user groups' names containing admin in AD will be retrieved.
-
Click Fetch. A table containing the AD group names and their
corresponding AppViewX user group names is displayed.
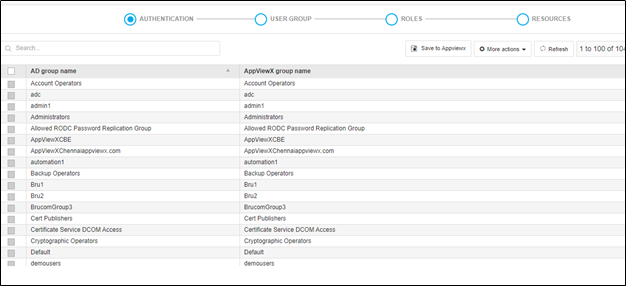
- Select the AD user group(s) that must be created with the same name in AppViewX and click the Save to AppViewX.
- You can also select the AD user group(s) to be mapped with the existing AppViewX user group and click the More Actions>> Create Map option in the dropdown. Select the required existing AppViewX user group to be mapped from the Mapping user group popup. Then, click on Save. Selected AD user group(s) will be now mapped to the existing AppViewX user group and the same mapping will be reflecting AD group names table.
- You can also export the specific fetched AD groups by selecting specific AD groups. Click on More Options>> Export. From the export user groups popup window, select Selected group(s) option and click Yes. The selected user group(s) should be automatically exported in.CSV format.
- You can also export all the fetched AD groups by clicking on More Options>> Export. From the export user groups popup window, select the All User Group(s) option and click Yes. All user group(s) should be automatically exported in (.CSV) format.