EST Configuration
- Log in to the AppViewX application with valid credentials.
-
Click the menu button.
The left navigation pane appears.
-
Click CERT+ .
The CERT+ left navigation pane appears.
-
Select Administration > Auto-Enrollment > EST.
On the EST list view page, defaultEST is displayed by default.
- Click + Add icon on the top-right.
- On the EST details page, under the Agent Details section, enter the Name, IP Address (node’s IP address where EST plugin is running), and the Gateway Port.
-
Under the Client Authentication section, select an Authentication
Mode from the drop- down list.
- Only Certificate TLS (If you are using AppViewX EST client) - During client authentication, only certificate TLS based authentication will be performed.
- Certificate TLS with HTTP as Fallback - During client authentication, when the certificate TLS fails, HTTP based authentication will be performed as a Fallback.
- Both Certificate TLS and HTTP - During client authentication, both certificate TLS and HTTP based authentication will be performed respectively after the successful completion of the other.
- If the user selects Certificate TLS with HTTP as Fallback or Both Certificate TLS and HTTP mode, the user will be prompted to enter the username and password along with the option to select the HTTP Authentication Mode.
-
Select an HTTP Authentication Mode: Basic or Digest
- Basic - During client authentication, only the username and password values will be considered for the HTTP based authentication.
- Digest - During client authentication, along with the username and password, nonce and realm values will be supported.
Note: This is the same certificate that was uploaded in the Upload the Client Authentication CA Certificate section. - Select the Issuer Certificate by entering the first three letters of the certificate name or serial number.
-
Under the CA Settings section, select the Certificate Group from
the drop-down list.
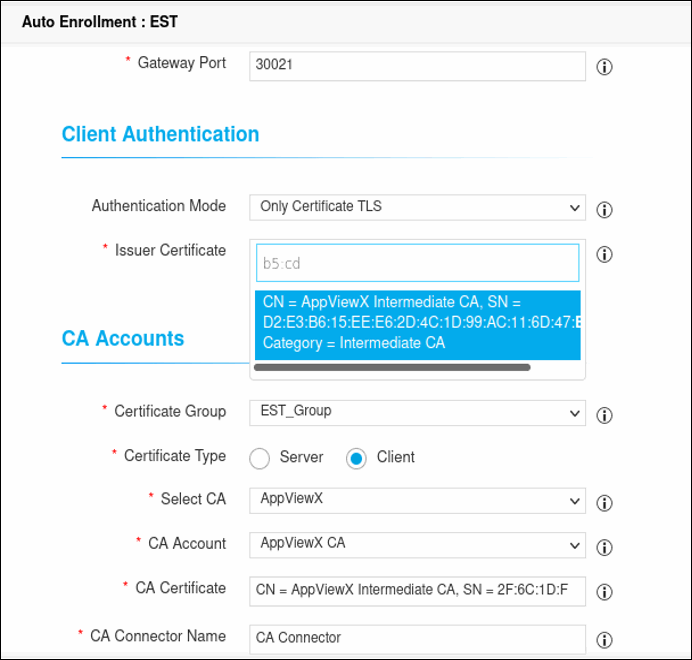
- Select the Certificate Type as Client or Server based on the requirement.
- Select the CA and CA Account from the respective drop-down lists. At present, AppViewX supports only AppViewX CA, EJBCA, and Microsoft CA.
- In the CA Certificate field, enter the certificate name and in the CA Connector Name field, enter a name for the CA Connector.
- In the Certificate Validity field, enter the number of days.
- Under the Advanced Settings section, select the Yes or No radio button to include or exclude truststore certificates. You can choose an option whether to share the trust store certificate with the client during the get CA operation.
- Enter the Retry Count and Retry Frequency in the respective fields.
- Click Save.