Segito CA
Configuring Segito
To configure the Segito CA:
- Go to > > > .
- Click the +Add icon on the top right of the page.
- Select the Segito in the left side vendor list.
-
Update the following details in the General
Information section as described in the table:
Table 1. General Information - Field and Description Table Name Description *CA Account name A unique name to identify the CA setting.
Note: No special characters other than ‘.’, ‘-’,’_’ are allowed. Names should not start with special characters.*Purpose/Usage Certificate Type for which CLM actions will be enabled.
Example: Server, Client
Proxy Required Enable this field if the CA communication needs to happen via Proxy. The proxy details configured in general settings will be used for communication. Data Center (AppViewX's CA agent) Select the data center through which the CA communication needs to happen. *: Mandatory fields -
Update the following details in the CA Configuration
section as described in the table. These fields are necessary for invoking
the Segito CA APIs for Certificate Management:
Table 2. CA Configuration - Field and Description Table Name Description *Base URL This URL will contain just the hostname of the Segito CA instance. For example, <https://www.segito.com>
Note: vendorSpecificSettings.url - invalid URL.*Credential Type Select the type of credential as desired from the dropdown list. The available options are,
- Manual EntryCredential
- List - CyberArk.
*Credential List Select the required credential from the dropdown list.
Note: This field will be enabled if the Credential Type is selected as Credential List - CyberArk.Account ID Account id details of Segito CA Account. *API Key API key specific to the CA account. This API key should have required permission to make API Calls.
Space is not allowed.Auto Approve Enable the Auto Approve option if all CLM requests from AppViewX do not need to be approved from Segito CA Account. *: Mandatory fields -
Select Fetch Divisions and Certificate Types.
The Division and Certificate types available in the Segito CA account will be fetched.
- Click Save.
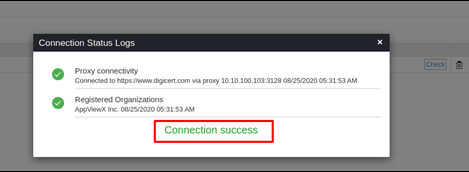
Validating Segito Connection
Once the Segito settings are added, the validation must be done to check whether the connection between AppViewX and Segito is configured properly.
- Go to > > >
- Select the Segito in the left side vendor list.
-
Click Check to validate the CA setting that is created.
The CA communication will be validated and the Connection Status will be shown as either Success or Failure.