Traffic Grid Widget
Configuration Steps:
-
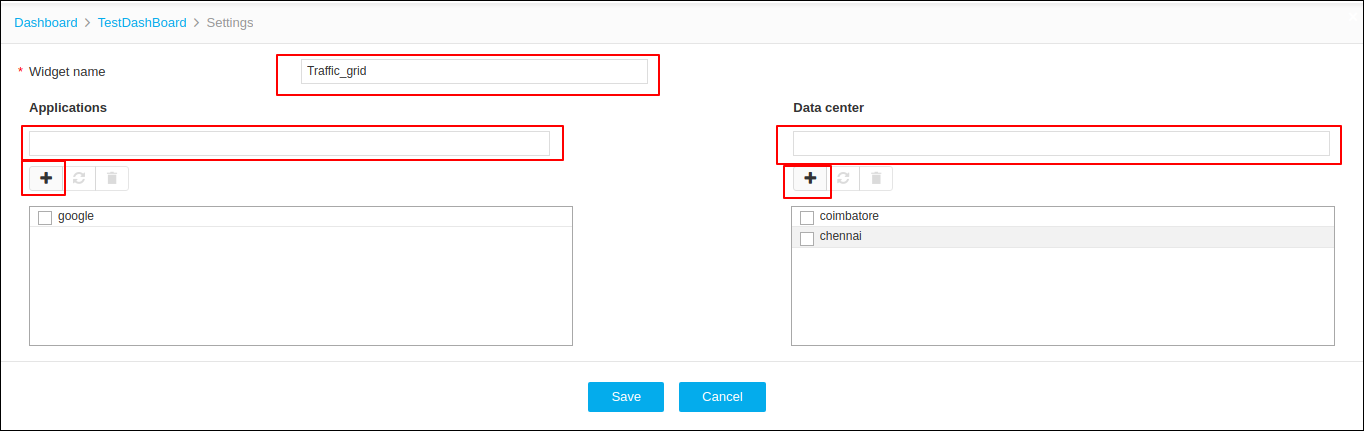
Enter the widget name.
-
Add Application Name and Data
Centers and click the + (Add)
icon.
Note: As required, rearrange the application and data center lists using a drag-and-drop method.
-
Click Save.
Sample Widget
-
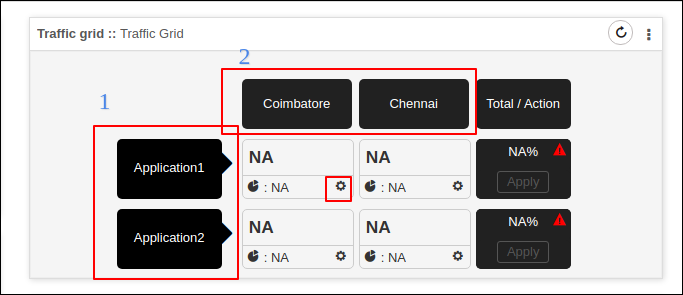
1. Applications Configured
-
2. Data Centers added
-
3. Click on Settings icon to configure objects and rules
-
1. Configure Availability Status
-
Provide required information
Table 1. Availability Status - Field and Description Table Field Description *Vendor Select vendor *Device State Available options:
Active : Active devices are listed.
Standby : Standby devices are listed.
All : All Managed devices are listed.
*Object type All Primary ADC objects are listed. *Object Name Object names can be searched and selected. *: Mandatory fields - Click Add, and then Save.
- Added objects can also be updated by selecting the object in the list and Update
-
Added Objects can be deleted by selecting the object in the list and
Delete
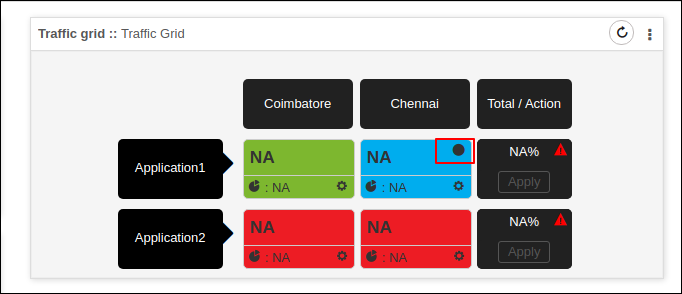
After configuring the objects the color representation changes according to status of the objects and State of the objects are also represented at top right corner of every application.
2. Configure Traffic Percentage
-
Provide required information
Table 2. Traffic Percentage - Field and Description Table Field Description *Vendor Select vendor *Device State Available options:
Active : Active devices are listed.
Standby : Standby devices are listed.
All : All Managed devices are listed.
*Object type Only traffic controllable objects like pool members are listed *Object Name Object names can be searched and selected. *: Mandatory fields -
Select the objects, and then click Add.
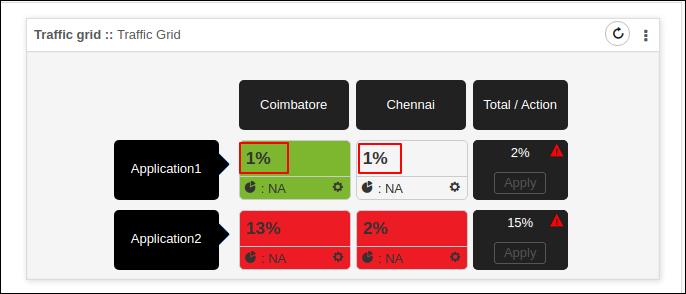
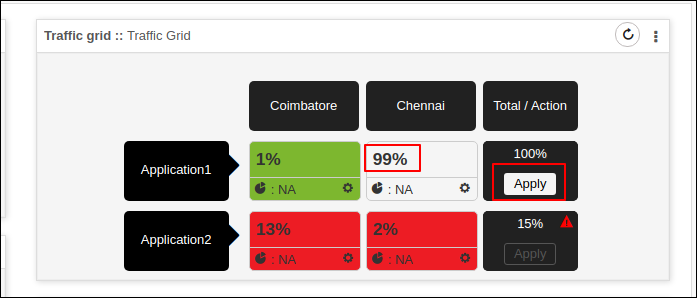
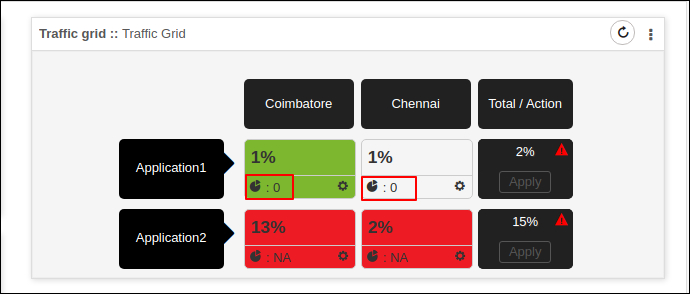
After adding the traffic percentage value is shown on the widget.
-
Modify the traffic percentage values and apply them to the objects by
clicking Apply.
-
Modify the traffic percentage and click Apply to execute action on the
objects added.
Note: The sum of all traffic percentages must be 100.
3. Configure the Statistics
| Name | Type | Description |
|---|---|---|
| *Display Name | Text Box | Enter user defined name for stats to be
displayed. Note: Only 10
characters are allowed. |
| *Vendor | Drop Down | Select a vendor from the drop-down list. |
| *Device State | Drop Down |
Select a device state from the drop-down
list. Available options are:
|
| *Object type | Drop Down | All Primary ADC objects are listed. Select an object ype from the drop-down list. |
| *Object Name | Drop Down | Object names can be searched and selected. Select an object name from the drop-down list. |
| *Statistics Type | Drop Down | Statistics parameters for selected object type are listed. Select a type of statistics from the drop-down list. |
| *: Mandatory fields | ||
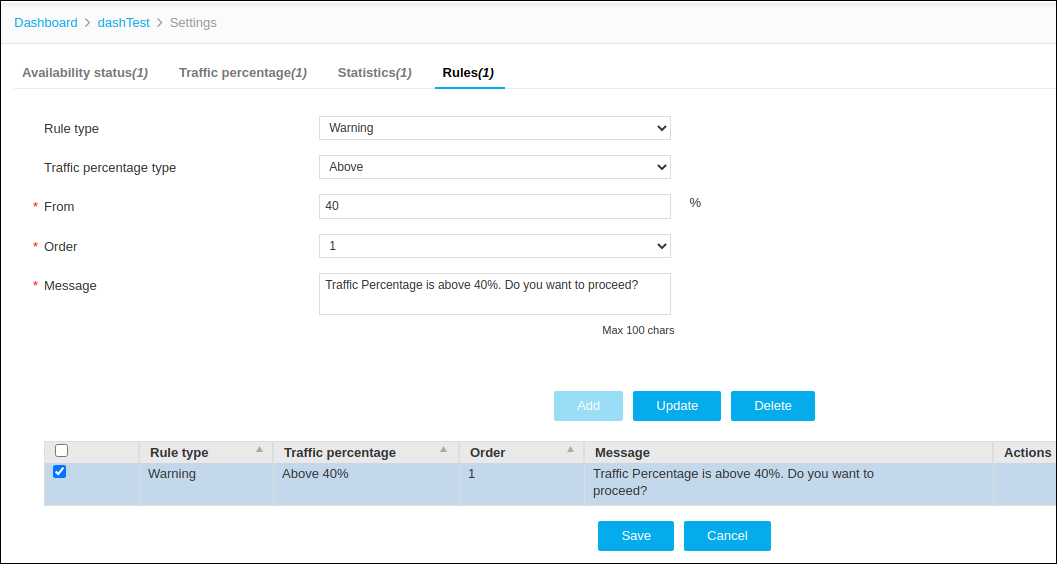
4. Add Rules For Action
-
Configure Warning for an action
-
Select Rule type as Warning.
-
Set the condition to be checked.
-
Set the order of execution. Maximum 10 rules can be configured.
-
Provide a warning message to be displayed when the condition becomes true.
-
Click Add and Save.
 On performing action , the warning message is displayed when the condition is true.
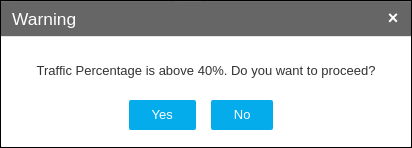
-
-
Configure Restriction for an action.
-
Select Rule type as Restriction.
-
Set the condition to be checked.
-
Set the order of execution. Maximum 10 rules can be configured.
-
Provide a Restriction message to be displayed when the condition becomes true.
-
Click Add and Save.
Adding restrictions will not allow the user to perform the action.
-
-
Configure action when certain condition met.
-
Select Rule type as Action.
-
Set the condition to be checked.
-
Configure Enable/Disable action on objects.
-
Select the Action Type and the object on which action has to be executed.
-
Click Add and Save.
When the condition becomes true, the configured action is executed on the object.
-