Configure a Class Management Widget
To configure a Class management widget on your dashboard, complete the following steps:
-
If you are creating a Class management widget as part of creating a new dashboard,
complete the steps in the Create a Dashboard
topic above, then jump to Step 5 below. If you are creating a Class management widget for
an existing dashboard, click
 in the Command bar of the dashboard.
- On the Create widget screen that pops up, select Class management as the widget type.
- Enter a name for the widget.
- Click Create.
- On the Settings screen, enter a name for the widget or leave the default value as is.
-
Leave the Select task field set to CreateGroup.
The Group field automatically uses the widget name as the default group.
- Enter a name for the group.
- Click Add to add the group to the widget.
-
(Optional) If you want to create a sub-group, enter another group name in the Name
field and click Add.
The new group is added under the original one.
-
(Optional) If you want to create a sub-group of a sub-group, select the sub-group in
the Group dropdown list, then enter the sub-sub-group name in the Name field before
clicking Add.
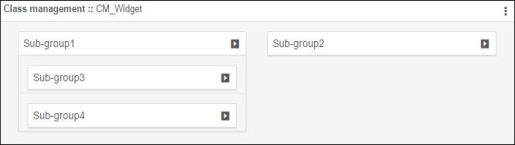
In the example below, CM_Widget is the group, Sub-group1 and Sub-group2 are created as sub-groups of CM_Widget, and Sub-group3 and Sub-group4 are created as sub-groups of Sub-group1.
-
After you have finished creating groups and sub-groups, select CreateAction from the
Select task dropdown menu.
The screen refreshes to display new fields on the screen.
-
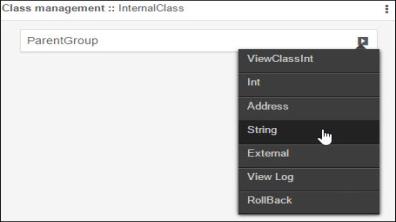
In the Actions field, select one of the following options:
-
View Class - This option gives users the ability to see the details of a class without being able to make any changes
-
Modify Class - This option gives users the ability to view and change the details of a class
-
In the Group field, select the group you are creating the action for.
-
In the Name field, give the action a name that clearly identifies what action the user can take.
-
-
In the Class field, start typing the name of the class that you are creating a
view or modify action for.
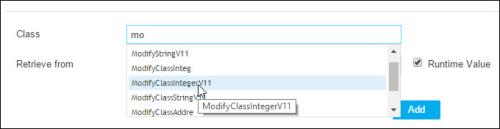 As you start to type, all classes that match the characters you have entered so far appear in a list.
 -
Select the class you want to add.
The Retrieve from field populates automatically with the location of the class that you selected in Step 15.
-
If you are creating a View Class action, click Add to add the class to the group. If
you are creating a Modify Class action, use the new fields that appear on the screen to do
the following:
- Add or remove values from the selected class using
 in the Available Values field and
  in the Selected Values
field.
in the Selected Values
field. - Add or remove devices from the selected class using in the Available Values field and in the Selected Values
field.
- Repeat steps 12-16 for each additional action you want to add to the group.
- Click Save when you are done.
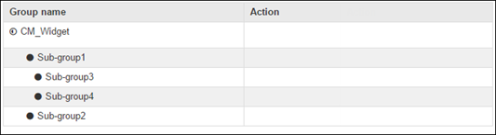
The group and all sub-groups you just created appear in a hierarchical structure within the widget. - Add or remove values from the selected class using
-
Click
 to
access the list of available actions for the corresponding group or sub-group.
to
access the list of available actions for the corresponding group or sub-group.