Configure an Application View Widget
To configure an Application view widget on your dashboard, complete the following steps:
-
If you are creating an Application view widget as part of creating a new dashboard,
complete the steps in theCreate a Dashboard
topic, then jump to Step 5 below. If you are creating an Application view widget for an
existing dashboard, click
 in the Command bar of the dashboard.
- On the Create widget screen that pops up, select the solution ADC from the dropdown list.
- Select the Custom radio button as the type of widget.
- Select the Application view as the widget you will be creating.
- Enter a name for the widget.
-
Click Create.
The Settings screen for the Application view widget opens, displaying an empty DefaultGroup where the user can add the objects.
-
Modify the widget name, group name, and add a description by clicking the corresponding
fields.
It will then becomes a text-entry field that allows you to make changes.
- Click the Add/Modify Objects button to add the objects at the group level.
- Select the vendor from the dropdown list.
- In the Device State field, select whether you want to include devices in the widget that have a status of Active, Standby, or All, where "All" means devices with a status of either Active or Standby.
- In the Device Name field, select the device name whose objects you want to add to in the widget.
-
In the Object type field, select the kind of object you are adding.
The options that appear in this field vary depending on the vendor you selected.
-
In the Hierarchy field, select the required level of hierarchy that should be displayed
in the dashboard.
The options that appear in this field vary depending on the vendor and the object type you selected. The objects based on your selection will be displayed in the Available Objects table at the bottom of the screen.
-
Select the checkbox beside the object name and click Add to add the objects to
the group.
- The Actions and Attributes corresponding to objects added will be automatically listed in their respective sections.
- By default, access to the actions and attributes apply to all objects within that group. You can customize these permissions manually by selecting or deselecting permissions for individual objects. For example, you might grant group members actions (such as Enable, Disable, ForceDown and so on) and attributes (such as Ratio, Order, Weight, Connections, and Priority) permissions to one object in a group, but only Enable, Disable, and Ratio permissions to another object in the group and no permissions to objects in a sub-group of the group.
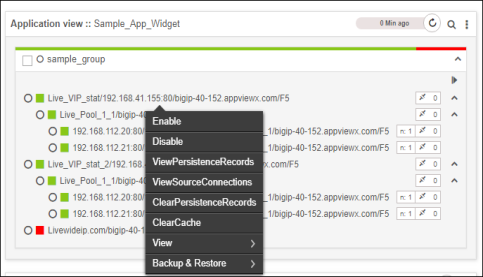
- When the widget appears on the dashboard, the full list of actions you created can be accessed by right-clicking any object within the widget.
-
Click
 or
or  to hide or view the full
list of attributes you created for a group.
to hide or view the full
list of attributes you created for a group.
-
When you have finished, click Save.
The dashboard screen reappears, displaying the widget you just created.
-
To create a new group, complete the following steps:
- Click the Create Group button under Global Actions.
- On the pop-up that appears, enter a group name to help the users identify it.
- Select the parent that you want to associate with the group from the dropdown list.
- Click Save.
- Repeat steps 7-15 to include the group in the dashboard.
-
To delete a group, complete the following steps:
- Click the Delete Group dropdown menu under Global Actions.
- Select the groups that you want to remove from the widget and click Delete.