Create a Rollback Workflow
Note: A rollback can be performed only on the completed workflows.
Note: Rollback workflows appear in green within the workspace.
To add a rollback workflow:
-
Click
 and select
Studio > Workflow.
The Workflow screen appears.
and select
Studio > Workflow.
The Workflow screen appears. - On the Workflow screen, create a new workflow or select an existing workflow to which you want to add a subflow.
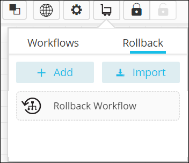
- Click the Rollback tab on the screen that appears.
-
Click
 and click Add
on the screen that appears.
The New Subflow screen appears.
and click Add
on the screen that appears.
The New Subflow screen appears. - In the Name box, provide a name for the rollback workflow.
- (Optional) In the Description box, provide additional information related to the rollback workflow.
-
Click Create to add the rollback workflow to the Rollback tab.
The rollback workflow workspace appears.Note: For more information on the sections and tasks that appear on the left-hand side, refer to steps 6 and 7 in the Create a workflowsection of this guide.
-
Go back to the main workflow and click the button.
The new rollback workflow appears in the Rollback tab.
- Drag and drop the rollback workflow to the workspace and link it with the main workflow as required.