Deploy as Request
-
Click
 and select Menu > AppVision >
Application.
The Application screen opens with the Inframap tab selected by default.
and select Menu > AppVision >
Application.
The Application screen opens with the Inframap tab selected by default. - Open the application infrastructure and make whatever changes are required.
-
Click the Provision dropdown menu and select
 in the Command
bar.
An Alert Message screen will pop up asking you to take a backup of the application before deploying any changes. Enter a name for the Blueprint to help the users identify it.
in the Command
bar.
An Alert Message screen will pop up asking you to take a backup of the application before deploying any changes. Enter a name for the Blueprint to help the users identify it. -
Click the Save button.
A copy of the live application infrastructure is created and the deployment screen opens with the Deploy as request tab selected by default.
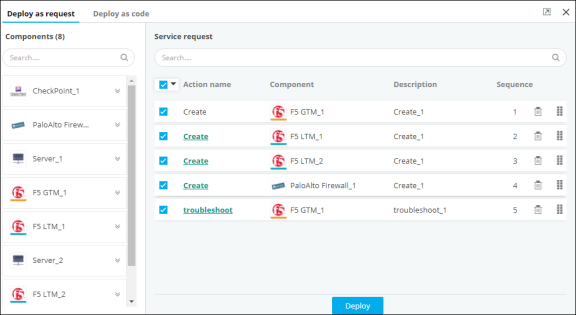
- A list of available components that are used in designing the application is displayed under the Components section.
-
Click
 each service component.
The field expands to display a list of actions associated with the service component.
each service component.
The field expands to display a list of actions associated with the service component. - Drag and drop the workflows to the Service requests section.
-
Click
 to arrange the requests in the sequence that you
want the automation tasks to be executed. Also, you can delete the requests from
the request cart by clicking
to arrange the requests in the sequence that you
want the automation tasks to be executed. Also, you can delete the requests from
the request cart by clicking  .
.
-
Select the workflow and on the respective Request form screen that
opens, fill in all the fields that contain a
 beside their
names.
beside their
names.
- Click Save draft to save a draft of the workflow.
- Repeat Steps 9 and 10 for all the workflows.
-
Click the Deploy button. The service requests are then deployed in the
sequence you designated in the Request cart.
A popup message is displayed at the top of the workspace: Application deployment request submitted. The changes made to the live Inframap are deployed only when the deployment request starts to retrieve the objects. The pre-validation and post validation scripts help the user ensure that the deployment was successful.