Configure WAF Risk Settings
To configure the WAF risk settings:
-
Click
 and select Control
Center.
and select Control
Center.
- Run a search.
- On the search results screen that opens, click the WAF tab.
-
Click
 in the Command
bar.
in the Command
bar.
-
On the Risk Report Settings screen that opens, click the Violation
Definition tab if it not displayed by default.
The predefined set of violations under the default category is displayed.
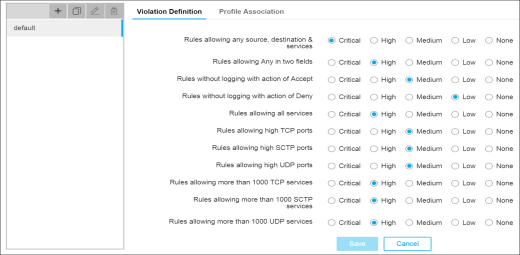
- Modify the severity of the existing violations by clicking the corresponding radio buttons as required.
-
(Optional) If you want to add a new violation, do the following:
- In the Custom Violations section, enter a name for the violation to help the users identify it.
- From the Parameters dropdown list, select the parameter based on which you want the risk report to be generated.
- In the Operators dropdown list, select either equal to or not equal to option depending on whether you want the parameters and the values provided to be an exact match.
- Enter a value for the parameter you selected in Step 7. b.
- In the Operators dropdown list, select the AND or OR option depending on whether you want to use a boolean operator between the parameters you set for the violation.
- From the Risk dropdown, select the severity that must be associated with the parameter.
- Click the Add button to create a new violation.
-
You can delete or modify the custom violation details by clicking either
 or
or  .
.
- Click Add and repeat Step 7.a. through 7.f. to add more violations to the corresponding category.
-
Click Save.
A new category is created which displays all the configured violations and its severity.
-
Click the Profile Association tab.
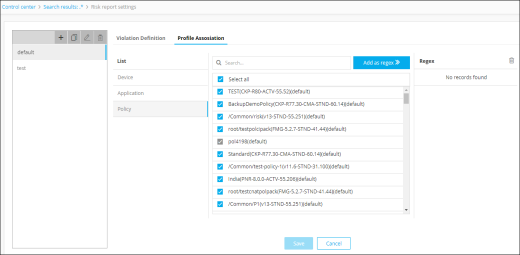
-
Select any one of the following levels under the List section, to associate
their profiles with the category.
- Device
- Application
- Select the checkbox beside the profiles and then, click Save.
-
If you want to use a regular expression (regex) to identify the profiles
you want to associate with the category, enter the regex in the Search field, then
click the Add as regex button. The list updates and shows checkmarks beside all
profiles that match the regex to indicate that they have been selected. The Regex
column also displays the total number of profiles that match each of the regex search
criteria you have created.
The risk reports are generated based on the set of violations and its associated profiles you configured. The Risk column in the search results screen will display the risk reports for each rule.
-
(Optional)To create more category of violations, follow these steps:
-
Click
 on the
left-hand side of the screen.
on the
left-hand side of the screen.
-
Click
 . All the
predefined violations available under the default category is displayed.
. All the
predefined violations available under the default category is displayed.
- Enter a name for the category to help the users identify it.
- Repeat Step 8. through 13.
-
Click
-
(Optional) To create an exact copy of the existing category, follow these steps:
-
Click
 .
The cloned category is created with all the violations and its associated profiles the same as the category you selected in Step 15.a.
.
The cloned category is created with all the violations and its associated profiles the same as the category you selected in Step 15.a.
-
Click
-
(Optional) To rename a category, follow these steps:
- Select the category on the left-hand side of the screen.
-
Click
 .
.
-
Modify the name of the selected category and then, click .
-
(Optional) To delete the category, follow these steps:
-
Click
 .
.
-
Click